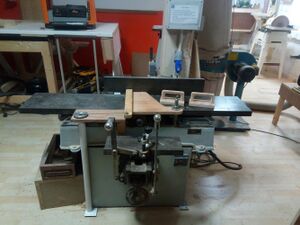
Equipment/Tyzack Planer
| Surface Planer (Tyzack) | |
|---|---|
 | |
| Sub-category | Woodworking |
| Status | Good working order |
| Last updated | 8 August 2022 11:42:14 |
| Training requirement | yes |
| Training link | lhs-induction-requests channel |
| ACnode | yes |
| Origin | Purchased for the space |
| Location | Wood shop |
| Maintainers | Woodshop team |
A surface planer used for generating a smooth and flat surface on a piece of timber, often starting from warped or rough-sawn timber. It is often followed in use by a thickness planer which produces a parallel surface on the opposite face of the board. Note - in the USA a surface planer is often called a jointer - there the word 'planer' confusingly often refers to a thickness planer
This planer has a maximum cutting width of 230mm and the overall table length is approx. 1300mm
The blades for this machine are very expensive and time consuming to sharpen (we have to take them to an external workshop with paid access) - please do not do anything that could damage the cutting edges (see below). If you do notice damage to the blades, please notify the maintainers at the earliest opportunity
Specific rules for this machine:
- Do not adjust the setting of the blades within the cutter head or the height of the outfeed table - setting these is a difficult and time consuming task carried out by the maintainers during a blade change
- Adjusting the fence angle (to produce bevelled edges) is fine, but please set accurately back to 90° afterwards
- Do not use any reclaimed wood (in particular pallet wood) on this machine - even tiny fragments of nails, screws or staples left in the wood will chip the blades
- Try not to plane bark - it usually contains traces of soil or grit which wear the teeth quickly. Use a handheld electric planer to remove the bulk of any bark before taking to the planer
- If your hands need to go anywhere near the blade (particularly when face-planing thin stock) always use a push stick or preferably, a pair of planer paddles
- Always use the planer with the guard installed
On the left hand side of the machine is a non-functioning slot mortising attachment. This is designed to act as a horizontal router with a bit held in the end of the rotating cutter drum. Significant work would be needed to bring this into operation, so for now please do not attempt to use it. Anyone who wants to take on the task of getting it running is more than welcome, please speak to the maintainers
This machine requires training and is ACNode protected. To arrange training, ask in the 'lhs-induction-requests' channel of our Discord Server
For beginners better to start with Triton Thickness Planer [1] and get familiar with wood working.
Information for Maintainers
The blade size for this machine is 9.1/4" x 1.1/8" x 5/32". This is not a stock size for modern planer blades, so larger blades may need to be purchased and ground down. 'NLS Tools' were the last supplier we used, at around £60 per pair of blades. We currently have 2 pairs of blades - the intention being we can sharpen one while the other is fitted, to enable quick changeovers The blades are best sharpened on a surface grinder (the space does not have one so this needs to be done externally - speak to Toby Molyneux or Dean Forbes for information). Two machined jig blocks are available to hold the blades for sharpening - these can be found in the woodshop maintainers cupboard along with the spare pair of blades
This planer was not originally fitted with any kind of blade guard, so we have added a home made one operated by a counterweight. The rope and the pivoting bearing should be lightly greased periodically
The original bolts and fittings on the planer are Whitworth (BSW) threads. Any new parts added on (e.g. blade guard) use metric hardware - if in doubt test. If new bolts are ever installed in the cutter head, note that they will need to be reduced in height or they may stick out further than the blades