Equipment/Makerbot Cupcake/LogBook
Logbook
20/4/2011 Operator: Kal
Makerbot is working. I played around with making a new Skienforge profile and called it "ABS" but its by no means perfect I will print a box just fine, but will struggle with starting more complicated parts because it picks up the plastic before it does the first layer. Maybe Glen can help tweak it or make some other profiles.
6/4/2011 Operator: Unknown
19:30 <@solexious> ?makerbot has been left on, stepper motors were red hot
19:32 < artag> if the stepper motors get red hot through bing left on, I would suggest
              that it's faulty.
19:34 <@JamesHarrison> that does seem a tad crazy
19:36 <@solexious> ?makerbot faulty
19:40 < Underhand> well that sounds more like a design fault rather than a unit fault
19:40 < Underhand> istr early (BBC Micro era) plotters suffering from similar issues
19:41 < artag> might be, but still requires fixing. The makerbot appears to suffer a
              number of problems of this sort.
19:42 < artag> it's not really a product, more of a starter-project that needs
              finishing. imho.
19:42 < Underhand> fixing presumably means redesigning the makerbot, right?
19:44 < artag> to be thorough, maybe. But probably incrementally. FOr instance, in this
              case, the stepper motors might be set to a lower current (or turned off
              completely) after a period of inaction. It's open source software and
              hardware. These things can & should be done.
19:47 < Fib> Last time I used the software, if you use the control panel to make Z+ Z-
            etc adjustments it leaves the steppers on unless you press the 'steppers
            off' button afterwards
In an effort to provide some useful information about the status of the makerbot, I've posted a couple of fragments from IRC here. Log entries by the operators would be far more useful, though, so please replace or amend these pastes if you have better information --Artag 19:11, 6 April 2011 (UTC)
5/4/2011 Operator: Unknown
22:05 < lovelace_> the makerbot is fudged again
22:05 < lovelace_> it was working this evening
22:05 < lovelace_> but the plastic feed got snagged up
22:05 < lovelace_> and then the head crashed into the plastic
22:06 < lovelace_> and now the print nozzle is caked in plastic
12/2/2011 Operator: Kal
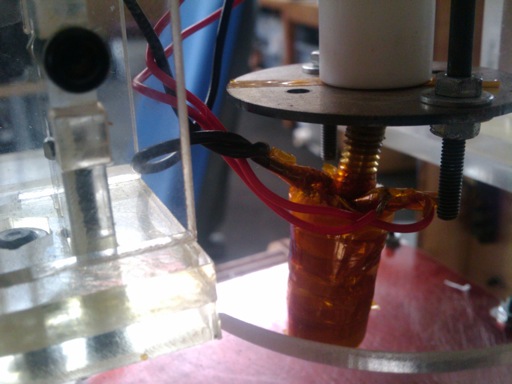
Glen Fitted the smaller power resistors in an attempt to make do with what we had. Unfortunately they fried and got borked before I could mount the print head back on the z-axis. I have left it to show the damage and have decided that it is not worth trying to do anything until we get the larger power resistors (which Nistur is obtaining from the US). My only suggestion is to try putting the smaller power resistors on but without any glass fibre insulation so that they do not get as hot.
7/2/2011 Operator: Elliot
I heard the MakerBot needed new resistors so I tried to find out the part. Using this photo I determined that they were 5Ω, 10Watt aluminium block resistors with a 1% tolerance. I checked Rapid, RS, and Farnell for this part but only Farnell had them in stock. However they were £8 each and required £16 shipping from the US. As I wanted to try and get the MakerBot working in time for the party I bought these alternatives from Rapid (62-8077) which have a 5% tolerance.
However, it turns out that they were physically too small and wouldn't align with the heater block mounting holes. I've had a look at the heater block plan on thingiverse and the fixing hole distance is apparently 15.9 mm or 14.3 mm. Looking at the datasheet for the Farnell US stock the B and D dimensions of the 10W 810 series are almost identical - these are the ones to get. Artag also found them at DigiKey.
25/11/2010 Operator: Glen
Problems
- The X and Y belt are too loose, this causes the print surface to move around randomly during printing.
- We are out of PLA plastic and little black ABS remains. I placed an order for £300 of plastic two weeks ago from kd85 there's been no sign of it. I'll try to bring in more black PLA from home this weekend.
Things to do
- The no-tape sign should be replace as the blue painters paper tape can be used on the heated build surface.
Things to stop doing
- Stop adjusting the machine with a spirit-level. Move the print head to the center of the print bed then move the bed around to check if it's level.
- Most of the compiler profiles shown to users generating gcode shouldn't be there and need to be removed from Skinforge.
15/10/2010 Operator: Billy
First experiments with Makerbot. Advice on initial printing from Solexious.
Printed a Reprap Power Ring from here http://www.thingiverse.com/thing:48
- A little scruffy on the upper side. Think the pla was pulling too tight.
Second attempt. Printing a plug from here http://www.thingiverse.com/thing:595
- Did not work. Started to print then stopped extruding. Print run aborted by user.
Realised that the hexnut on the front-right screw thread was floating loose on it's own. Initially did not know how to repair it. Examining the other corners of the extruder plate, i saw how it fitted together. Lifted the extruder plate, and ran the hexnut back into place. Also saw that the bolts holding the upper lockplate in place were loose, so tightened those. Was not sure about the calibration. Got it roughly right, then checked with spirit level and reset till balanced. Front supports of the extruder plate are 2-3mm higher than the back supports. Not sure if this is correct, but the same pattern is found on the print bed, so it seems to balance.
Could someone check whether i got this right.
Third attempt. Printing a plug from here http://www.thingiverse.com/thing:595 Included a raft this time.
- Solexious pointed out that the pla was pulling a little tight on the reel. Extended some slack, and gave a slight push to get the initial extrusion running. Initial raft printing did not take till the pla pushed down into the head. Guess that it hadn't got a good grip. Once the extruder got a grip on the pla, it flowed correctly.
- Kept an eye on the tension, which avoided this hassle.
- Print run went perfectly until the end. Printed plug was stuck to the print bed. Googled for this. Not an uncommon problem, general recommendation was use a flexible spatula to remove the print. Not sure how much force is safe to use with the print bed, and it's 0315am, so heading home. I'll come back in the morning and attack it with a fresh head, and other people to ask for advice.
30/10/2010 Operator: Oni
Makerbot is being a little weird today but it is likely to be my model. Had some issues with the half companion cube model. Attempted to print out the pyramid and this worked but it was somewhat skewed. It would appear that my blender model is causing massive errors as it doesnt create the raft and just goes to the startpoint and makes a high pitched whistle.
07/10/2010 Operator: samthetechie + Suse
- Changed back to PLA reel from ABS (black).
- Printed 2 of x-180-z-bearing-plate_2off.stl, 1 of bed-height-spacer-31mm_1off.stl, 3 of bed-spring_4off.stl.
24/09/2010 Operator: Glen
- Mounted all circuit boards
- Both heating elements are now powered my solenoid
- Replaced some wiring.
- Build umbilical cord to Plastruider.
- Connected fan to Extruider board.
To do:
- Print something.
22/09/2010 Operator: Glen
- Assembled Makerbot with MK5 Plastruider.
Current state:
- Working perfectly.
To do:
- Mount extra circuit boards where they'll not short out.
- Unite wires going to Plastruider into a single umbilical cord.
- Start taking bets as to when the Makerbot will be broken.
10/08/2010 Operator: Oni (and Russ!)
- Walked in, warmed up build platform and extruder. Both reached required temperature
- Tested extrusion which failed. Attempted to use the motor to pass through the feed. This failed.
- Attempted to reverse the motor and feed the plastic back out of the extruder. This worked for about 1cm then stopped. Considerable pressure with pliers would not remove it
Current state:
- Blocked. Needs clearing, but presumably needs a new insulator to get warm enough.
08/08/2010 to 09/08/2010 Operator: samthetechie + Kal
- Built new extruder nozzle: All Metal Hot end. Need some advice on alignment for drilling from both ends on the lathe, we end up with a slight lip in the middle (tried twice).
- Wire struggles to warm new, larger, thermal mass of the heatsink. Target temparture of 200 deg C was reading 190 deg C.
- Filament gets stuck just above the brass nozzle. We assume that it jams due to low/ incorrect temperature gradient along the extruder length, need an x-ray machine to see what is happening inside :P.
- New Nichrome wire needed. It is reading 6.3 ohms, should be 8 ohm.
- Thermistor reading around 77.7kohms @ 25 deg.C. Suggest buying a new one with known characteristics in order to calibrate beta value (currently it is set to default values).
- Built a rack to hold the plastic filament.
- Repaired extruder pinchwheel. Used araldite to firmly secure the acrylic pinchwheel to the bearing. Perviously it would slip, causing the filament to disengage. now it feeds perfectly.
Current state:
- Everything works great. But the extruder head ALWAYS jams. After at least 5 extruder rebuilds I am out of ideas pretty much. Need to figure our why it jams:
- too hot? too cold? rough inner surface? step inside nozzle due to poor machining? possetion by the devil?
Things to do:
- Buy lots of new nichrome
- Buy some new thermistors so we can properly calibrate the temperature OR a thermocouple.
- Try to improve nozzle design/machine it better to stop it jamming.
07/08/2010 Operator: Russ
- We found the bag of spare parts in Tom Scott's box. It's now on the table.
- Extruder pinchweel was too loose. There's a silvery piece of metal with a little masking tape flag on top in the parts bag which should be used as a spacer to adjust it. Position of the feed reel should not be a problem - the extruder has tipped the makerbot over once before! Tangling of the feedstock is more of a problem.
- The current - major - problem with printing is oozebane (same as back when I last used it). This is an interaction between skeinforge's software oozebane and the Makerbot hardware oozebane.
- Tried to print a hollow triangular pyramid for MattP, completely failed due to oozebane.
- I am working on a new all-steel extruder hot end (http://www.thingiverse.com/thing:3452)
06/08/2010 to 07/08/2010 Operator: samthetechie + Kal
Total rebuild of Extruder:
- Removed all previous Kapton and thermal insulation.
- Nichrome wire re-soldered and rewound
- Thermistor replaced (direct contact with metal and seated in a groove made with a hacksaw)
- re-soldered and insulated with Kapton tape.
- Replaced PTFE section with a brand new piece made in the tool shop. Design was modified to make a tight seal ---> no more splurging.
- Inverted the round plastic (Printed) plate which connects extruder head to extruder body. This allows for a tighter fit.
- Reinstalled the extruder.
- Purged nozzle to remove any burnt residue.
Printing of parts:
- Printed first part : frame vertex from mendel reprap.
- Printed second part: space invader 7 from thingyverse.
- Adjusted printing bed with spirit level and masking tape.
- Printed third part: hackspace entry emblem.
Current state:
- Extruder in perfect working order so doesn't need to be touched at all.
- Heated bed still needs adjusting to perfect the printing accuracy
- At the very least we need to start using the z-axis endstop to remove user error and improve work flow of multiple parts.
Task for future:
- PLA reel must be placed above the makerbot to improve feeding as there where a few issues
- A drying oven for the PLA must be constructed/purchased to GREATLY improve the print quality (I can explain why if you ask) -- because of this?
- The feeding mechanism has some issue of not feeding properly every now and then. There is a small snapped part caught inside the feeding assembly that needs to be sorted but is ok for the moment.
6/08/2010 Operator: Glen
- Why is the Makerbot in bits and where are all of it's nuts and bolts going? We really should replace missing bolts.
- I cleared the blockage out from the extruider.
- The print head heating coil resistance should be 7 ohms, it's infinity, which means that there's a problem with the nicrome wire.
4/08/2010 Operator: samthetechie + Kal
- checking axis alignment with spirit level, [Done]
- making notes about suggested fixes/troubleshoot
- 1.Needs another piece of u-shaped wood on underside of perspex extruder platform to stop the nut disengaging from the platform x4
- 2. Purge print head
- 3. Improve insulation around extruder nozzle. Then recalibrate nozzle.
- Need to get in touch with people that made/worked on this makerbot
Current state :
- Extruder head removed and cleaned. Not reattached as it needs work (see below)
- On observation it requires a rebuild to stop leakage.
- Another round metal plate needs to replace the printed part as it has creeped, causing the leaking and general issues.
- silicone sealant maybe useful ( Good thermal resistance and easily available)
- Better insulation solution required as all the horrible glass mat stuff was removed during cleaning process.
- Perhaps replace the current brushed DC extruder motor with a proper stepper motor
31/05/2010 Operator: Glen
- Added new macro-scale thermistor to the print head. The last sub millimetre one fell apart.
- The PSU wasn't heating the bed and the print head. A glass cloth insulator was added to the bed and around the extruder.
- Glen printed two medium sized objects with PLA.
- Solexious fixed the build platform and X axis
- it's still spooging plastic from the side of the print head. Glue, tighter threads and jubilee-clips have been tried.
15/05/2010 Operator: Nandish
- connection/on-off voodoo & preheating with no problem
- print not started, concerned that metal extruder barrel looks much further out the PTFE Barrel than on the assembly instruction
- update 17/05/2010: spoke to Russ, this is not normal - replacement part is required

03/05/2010 Operator: Jasper
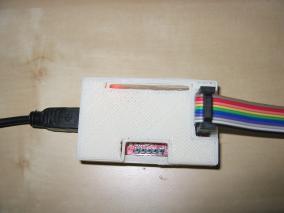
- printed the bus pirate box for real this time (after a bit more trial and error)
- the X axis stepper motor was backwards so swapped the connector around, now things won't be mirrored.

27/04/2010 Operator: Russ (write up by jasper)
- JasperWallace printed a box for a BusPirate, discovering that printed things shrink by 0.5% to 0.75%
19/04/2010 Operator: Russ
- Motherboard + Extruder firmware to v2.0 release 1. HBP now internally powered.
18/04/2010 Operator: Nandish
- was unable to find SDCard reader - printed via USB
- multiple failed prints at raft lay down
- unconnected HBP cables lifted plate while it moved warping the raft
- abs not adhering to HBP - maybe extrusion temp
- extruder ploughing up cleanly laid down raft in one corner and printing in mid-air at other
- resolved raft issues with calibration
- partially successful print aborted after abs feed caught on speakers
- several layers missed, extrusion resumed in mid-air, print aborted
13/04/2010 Operator: Russ
- Installed heated build platform v2, externally powered.
29/03/2010 Operator: Solexious
- First attempt, extruder was to close to the platform resulting in the abs being 'threaded'. After heating the extruder and manually feeding the abs the makerbot was back in working order.
- The makerbot successfully printed a single, and a 2X2 grid of Hackspace Coins http://www.thingiverse.com/thing:2113
29/03/2010 Operator: Russ
- After a couple more crashes, downgraded extruder to 1.5.
16/03/2010 Operator: Russ
- Ambient temperature is quite a bit warmer now, which probably helps.
- Successfully printed a whistle! (the overhang on the top means it's not terribly functional but it finished)
- Across about 70mins of print time I had two crashes :/
11/03/2010 Operator: Russ
- Received and fitted new insulator/barrel/nozzle/nichrome. Extruder is working much better now.
- Also received 5lbs of PLA. I don't want to use it until we've done the M8 nut mod to the extruder, and we've got a spare insulator retainer. So we're still on ABS.
- Upgraded motherboard to 1.5, extruder to 1.8 with heated build surface. My ReplicatorG is now 0013.
- Managed to successfully print an insulator retainer! It's a bit stringy but it's a start.
- I'm wondering if the thermistor is a way off. Fiddling with the thermistor calibration didn't get very far.
- I honestly think we're nearly there ;)
02/03/2010 Operator: Russ
- Filament drive pulley replaced. We now have 4 spares.
- Still hitting problems where the filament drive stopped and gouged a hole in the pulley, which seems to indicate barrel undertemperature or blockage.
- Tried increasing temperature. Increasing extruder temperature above 255 appears to cause the heater to run away. I melted the insulator. Silly me.
- Ordered new insulator+barrel+nozzle+nichrome.
11/02/2010 Operator; Glen
- To print warp free large objects heat the perspex plastic bed to 100'C with the hot air blower then make sure the first two base layers are stuck to the bed by adjusting the Z-axis height. Don't use the electric fan heater as this increases cooling of the plastic. I used the hot air de-soldering blower at 100'C to keep the plastic warm while printing, though I didn't try printing without this.
- The extruder gear wheel has a part missing from it that limits where the plastic feed can rest against the gear teeth. Until the drive gear is replaced the plastic feed can work it's way next to the idler wheel where it will no longer be driven. I tried putting two idler wheels in to stop the feed from having any space to get away from the drive gear, but this didn't work so I went home.
- Consider selling the printer to some poor fool on eBay, as far as I know it's printed no large objects despite receiving dozens of hours of maintenance and is clearly possessed by angry spirits.
09/02/2010 Operator: Russ
- Extruder with 2 idler wheels doesn't appear to work at all.
- Reassembled the extruder with one idler wheel, moving the drive wheel up the shaft a little.
- This works, but the extruder stalls after a random amount of time! WTF. We need a new drive wheel.
08/02/2010 Operator: Glen
- Can printed half a large object with no warping by melting the raft to the print surface.
- Print-head failed push plastic feed into nozzle
- Dismantled the print-head and found the gear that drives the plastic feed stock had broken in two and the two parts had ground against each other to produce many tiny metal shards.
- After cleaning the print-head the plastic would not come through unless pushed by hand.
06/02/2010 Operator: Russ
- Downgraded both motherboard and extruder to 1.5 firmware.
- Printing off SD card, no crashes observed.
- Managed to get about 80% of a shot glass printed. Glitches caused by contraction were an issue, and eventually it got knocked off by the print head.
- I'm fairly sure the hardware is working fine. Problems I'm now seeing are caused by either ambient temperature/airflow or skeinforge settings.
04/02/2010 Operator: Russ
- Walked in, started it up, extruder works fine.
- Extruder idler pulley needed re-adjusting twice. (Note: that the thin silvery metal bar in the Makerbot toolkit is designed to be used as a spacer for this.) Should be done up nice and tight now though.
- Continual tweaking of z-stage stepper strength, now at about 75%
- Accidental Z-stage/build platform collision required re-levelling of Z-stage (seems the best way to do this is by releasing one of the Z idler pulleys and twisting the studding, instead of fiddling with the nuts). Seems pretty smooth now.
- X belt tension was too low, there was a lot of slop. It's pretty tricky to get it tight enough.
- Lots of bolts on the XY stage were loose! This makes a horrendous racket when it's actually printing at full speed... Tightened them up
- Packed both X runner bars with hot glue, they were also moving about and making a racket.
- I managed to make it print 1/3rd of a shot glass, then it crashed. (About 60,000 gcode commands/30mins in.) Need to know what firmware to put on it to stop the crashing.
Following changes over skeinforge 0006 defaults are active (on my laptop):
 Feedrate: 27.0 mm/s
 Base Layer Thickness over Layer Thickness:  1.5
 Interface Layer Thickness over Layer Thickness: 0.8