Difference between revisions of "Equipment/Mill"
| (18 intermediate revisions by 8 users not shown) | |||
| Line 1: | Line 1: | ||
| + | {{EquipmentInfobox | ||
| + | |name=Small milling machine <!-- Name of the item. --> | ||
| + | |image=Mill01.jpg <!-- Image of the item. Leave with placeholder image if none exists. --> | ||
| + | |model=Unknown <!-- Model --> | ||
| + | |category=Equipment <!-- Main category. Please leave alone to keep item in this category --> | ||
| + | |subcat=defunct<!-- Sub-category if one exists. Please check main listing to see other categories contained within the main one --> | ||
| + | |status=Good working order | ||
| + | |consumables=Unknown <!-- Any items used up in normal operation, such as; ink, paper, saw-blades, cutting disks, oil, etc.. --> | ||
| + | |accessories=Unknown <!-- Any items associated with the equipment but not consumable, such as; drill bits, safety gloves, goggles, etc.. --> | ||
| + | |reqtraining=<!-- Is training required to use this equipment? Yes or no. --> | ||
| + | |trainlink=Unknown <!-- If training is required, provide a link to training signup or contact page. Otherwise leave blank. --> | ||
| + | |acnode=No<!-- Is the equipment ACnode locked? --> | ||
| + | |owner=Nigel W <!-- Provide a link to owners members page if other than LHS --> | ||
| + | |origin=Loan from Nigel W <!-- If via pledge, please link to the completed pledge page on the wiki --> | ||
| + | |location=Basement, Workshop<!-- Floor, room/zone and location within that area --> | ||
| + | |maintainers=<!-- NO LINKS PLEASE; it currently breaks the template. If someone is nominated as managing the upkeep of this item, please list them here. --> | ||
| + | |template_ver=1.1 <!-- Please do not change. Used for tracking out-of-date templates --> | ||
| + | }} | ||
== What? == | == What? == | ||
We have a [http://www.chesteruk.net/store/conquest_mill.htm Conquest Mill from Chester UK] in the Hackspace. It drills (makes holes in things) and mills (takes layers of material off). It's ideal for use on metal, wood, and plastic. | We have a [http://www.chesteruk.net/store/conquest_mill.htm Conquest Mill from Chester UK] in the Hackspace. It drills (makes holes in things) and mills (takes layers of material off). It's ideal for use on metal, wood, and plastic. | ||
| + | == Status == | ||
| + | [[File:Warning_sign_SLN.jpg|thumb|right|Warning]] | ||
| + | July 2015 | ||
| + | It has a broken gear again, there doesn't seem to be any in stock with UK suppliers at the moment. | ||
| + | |||
| + | May 2012 | ||
| + | Report on the mailing list of a whirring / wobbling sound. | ||
| + | Needs checking. It's possible some of the gear teeth have been ripped off again. | ||
| + | Does it make the noise on both the high and low gear settings? | ||
| + | If the business end is rotated by hand does it turn smoothly or sometimes slip? | ||
| + | |||
| + | May 2011 | ||
| + | Some of internal gearwheel teeth had been ripped off. | ||
| + | It is likely that someone changed speed setting with the motor running, there will have been a loud grinding noise. | ||
| + | |||
| + | |||
| + | Some cogs were purchased at moderate expense, [http://ansteckend.org.uk/ajp/vertical_mill_gears.JPG picture]. Nigel has spent hours disassembling, hammering and reassembling the mill. | ||
| + | |||
| + | Please do not change gear with the machine running | ||
| + | |||
== Safety == | == Safety == | ||
| Line 9: | Line 47: | ||
* '''Always''' wear goggles. | * '''Always''' wear goggles. | ||
* '''Always''' clamp your workpiece securely. | * '''Always''' clamp your workpiece securely. | ||
| − | * '''Always''' tie long hair, baggy clothing, etc. out of the way. | + | * '''Always''' tie long hair, necklaces, baggy clothing, etc. out of the way. |
* '''Never''' leave the mill running unattended. | * '''Never''' leave the mill running unattended. | ||
| − | |||
== General usage instructions == | == General usage instructions == | ||
| Line 17: | Line 54: | ||
# Figure out what you're going to do. Cut your material down to a roughly correct size, if necessary, using a hand tool. | # Figure out what you're going to do. Cut your material down to a roughly correct size, if necessary, using a hand tool. | ||
# Ensure the machine is fully off. | # Ensure the machine is fully off. | ||
| − | # Clamp your workpiece securely and set up the tools you need. If you're milling, make sure you've selected a milling tool and not a drill bit. Make sure your tool is suitable for the material you're using (eg. don't use a wood drill for a metal project). | + | # Clamp your workpiece securely and set up the tools you need. If your material does not fit in the standard vice - you may want to remove the front claw of the vice (lift the small black latch) and use a D-Clamp; or alternatively use the specialist clamps in the red plastic holder mounted against the wall to your right. http://techtv.mit.edu/genres/24-how-to/ has some nice videos as to how to do this. |
| − | # Set the mill stops accordingly. Make sure they're set so you don't damage the vice. If you're drilling a hole all the way through, you should put some scrap material under the workpiece as well as setting a limit. If you're milling, make sure the stops are set so you can't contact the vice top. | + | # If you're milling, make sure you've selected a milling tool and not a drill bit. (Drills are to drill a hole and only cut/mill/shave/shear at the end of the drill 'down' - while milling tools can go sideways and have sharp cutting edges all the way up). |
| + | # Make sure your tool is suitable for the material you're using (eg. don't use a wood drill for a metal project). Check the speed you are using - some materials need a slow speed; some need a high speed - whilst one also take into account the speed you need to let the spirals take out the cut material. Google for 'milling speed feed' and/or calculator | ||
| + | # Set the mill stops accordingly. These are the stoppers which stop the drill or milling tool from going to far. Make sure they're set so you don't damage the vice. If you're drilling a hole all the way through, you should put some scrap material under the workpiece as well as setting a limit. If you're milling, make sure the stops are set so you can't contact the vice top. | ||
| + | # Before turning the machine on - make sure it is well clear of any material - and can start up without touching anything. | ||
# Turn the machine on. Do your work. If milling, don't try to take off too much material at once. Multiple passes result in a better-quality result and less wear/stress on the mill. | # Turn the machine on. Do your work. If milling, don't try to take off too much material at once. Multiple passes result in a better-quality result and less wear/stress on the mill. | ||
| + | ## Beware that tools can get hot. And that hot tools may deform (i.e. get larger/longer). So keep the stress low and reasonable. | ||
## As well as moving the tool up and down (using either the coarse control towards the back or the fine control towards the front) you can move the table in an X-Y direction using the wheels. | ## As well as moving the tool up and down (using either the coarse control towards the back or the fine control towards the front) you can move the table in an X-Y direction using the wheels. | ||
| + | ## Remember that there are limits to the lateral force on the milling tool (which can easily snap) and the clamp/column itself. You generally should not force it. If you see any observable bending or deforming when moving X-Y - then assume you are going to fast. | ||
# Turn the machine fully off. Remove your workpiece and clean up the mill. Try to leave things tidier than they were to begin with. | # Turn the machine fully off. Remove your workpiece and clean up the mill. Try to leave things tidier than they were to begin with. | ||
| + | # Be particularly aware that some materials (like stainless steel and aluminum) can be contaminated by other material. I.e. a spec of normal iron or steel on high grade stainless steel - especially when impacted at high speed from a drill bit or under pressure from the vice - will cause rust. | ||
## Remove any swarf from the mill/drill tool. | ## Remove any swarf from the mill/drill tool. | ||
## Clean the vice and surrounding desk using the vacuum cleaner. | ## Clean the vice and surrounding desk using the vacuum cleaner. | ||
| − | ## Put the drill/mill tool back in its box. | + | ## Put the drill/mill tool back in its box. Beware that it may be hot. |
| − | |||
== Pictures == | == Pictures == | ||
| Line 42: | Line 84: | ||
* [http://robotroom.com/DualFanFace.html Machining a brass faceplate]. Uses hand tools, a mill, and a lathe. Lots of illustrations. | * [http://robotroom.com/DualFanFace.html Machining a brass faceplate]. Uses hand tools, a mill, and a lathe. Lots of illustrations. | ||
* [http://robotroom.com/LEGOHubMadeOnMill.html Making a lego wheel hub on a mill]. | * [http://robotroom.com/LEGOHubMadeOnMill.html Making a lego wheel hub on a mill]. | ||
| + | * [[Pledges/Lathe_Milling_Machine_Combo | A pledge to get a 3-in-1 combo mill/drill/lathe for the Hackspace]] | ||
| + | * [http://wiki.hackspace.org.uk/wiki/File:X2_Parts_List.pdf Exploded diagram and parts list(looks like the right model?)] | ||
| + | * [http://www.arceurotrade.co.uk/Catalogue/Machine-Spares/X2-Mini-Mill-Spares Retailer of spare parts] | ||
| + | [[Category:Long-term Loan]] | ||
| + | [[Category:Tools for use on wood]] | ||
| + | [[Category:Tools for use on metal]] | ||
| + | [[Category:Tools for use on plastic]] | ||
Latest revision as of 20:16, 23 March 2019
| Small milling machine | |
|---|---|
 | |
| Model | Unknown |
| Sub-category | defunct |
| Status | Good working order |
| Consumables | Unknown |
| Accessories | Unknown |
| Training link | Unknown |
| ACnode | No |
| Owner | Nigel W |
| Origin | Loan from Nigel W |
| Location | Basement, Workshop |
What?
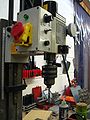
We have a Conquest Mill from Chester UK in the Hackspace. It drills (makes holes in things) and mills (takes layers of material off). It's ideal for use on metal, wood, and plastic.
Status

July 2015 It has a broken gear again, there doesn't seem to be any in stock with UK suppliers at the moment.
May 2012 Report on the mailing list of a whirring / wobbling sound. Needs checking. It's possible some of the gear teeth have been ripped off again. Does it make the noise on both the high and low gear settings? If the business end is rotated by hand does it turn smoothly or sometimes slip?
May 2011 Some of internal gearwheel teeth had been ripped off. It is likely that someone changed speed setting with the motor running, there will have been a loud grinding noise.
Some cogs were purchased at moderate expense, picture. Nigel has spent hours disassembling, hammering and reassembling the mill.
Please do not change gear with the machine running
Safety
This is not comprehensive. If you are unsure, ask someone for help.
- Always wear goggles.
- Always clamp your workpiece securely.
- Always tie long hair, necklaces, baggy clothing, etc. out of the way.
- Never leave the mill running unattended.
General usage instructions
- Figure out what you're going to do. Cut your material down to a roughly correct size, if necessary, using a hand tool.
- Ensure the machine is fully off.
- Clamp your workpiece securely and set up the tools you need. If your material does not fit in the standard vice - you may want to remove the front claw of the vice (lift the small black latch) and use a D-Clamp; or alternatively use the specialist clamps in the red plastic holder mounted against the wall to your right. http://techtv.mit.edu/genres/24-how-to/ has some nice videos as to how to do this.
- If you're milling, make sure you've selected a milling tool and not a drill bit. (Drills are to drill a hole and only cut/mill/shave/shear at the end of the drill 'down' - while milling tools can go sideways and have sharp cutting edges all the way up).
- Make sure your tool is suitable for the material you're using (eg. don't use a wood drill for a metal project). Check the speed you are using - some materials need a slow speed; some need a high speed - whilst one also take into account the speed you need to let the spirals take out the cut material. Google for 'milling speed feed' and/or calculator
- Set the mill stops accordingly. These are the stoppers which stop the drill or milling tool from going to far. Make sure they're set so you don't damage the vice. If you're drilling a hole all the way through, you should put some scrap material under the workpiece as well as setting a limit. If you're milling, make sure the stops are set so you can't contact the vice top.
- Before turning the machine on - make sure it is well clear of any material - and can start up without touching anything.
- Turn the machine on. Do your work. If milling, don't try to take off too much material at once. Multiple passes result in a better-quality result and less wear/stress on the mill.
- Beware that tools can get hot. And that hot tools may deform (i.e. get larger/longer). So keep the stress low and reasonable.
- As well as moving the tool up and down (using either the coarse control towards the back or the fine control towards the front) you can move the table in an X-Y direction using the wheels.
- Remember that there are limits to the lateral force on the milling tool (which can easily snap) and the clamp/column itself. You generally should not force it. If you see any observable bending or deforming when moving X-Y - then assume you are going to fast.
- Turn the machine fully off. Remove your workpiece and clean up the mill. Try to leave things tidier than they were to begin with.
- Be particularly aware that some materials (like stainless steel and aluminum) can be contaminated by other material. I.e. a spec of normal iron or steel on high grade stainless steel - especially when impacted at high speed from a drill bit or under pressure from the vice - will cause rust.
- Remove any swarf from the mill/drill tool.
- Clean the vice and surrounding desk using the vacuum cleaner.
- Put the drill/mill tool back in its box. Beware that it may be hot.
Pictures

Our milling machine.
Another view, showing the control panel.
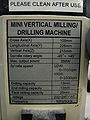
The specifications.
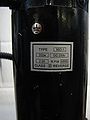
The motor specifications.


More info
- Product page for our mill
- Machining a brass faceplate. Uses hand tools, a mill, and a lathe. Lots of illustrations.
- Making a lego wheel hub on a mill.
- A pledge to get a 3-in-1 combo mill/drill/lathe for the Hackspace
- Exploded diagram and parts list(looks like the right model?)
- Retailer of spare parts