Difference between revisions of "Equipment/PCB etch station"
Jump to navigation
Jump to search
| Line 1: | Line 1: | ||
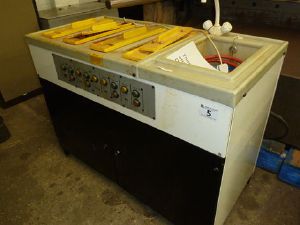
[[File:Pcb labstation.jpg|thumb|right|Etch station]] | [[File:Pcb labstation.jpg|thumb|right|Etch station]] | ||
| − | == | + | ==Status== |
| + | |||
| + | ''We are currently planning on fixing-up the unit and working out how it should be configured:'' | ||
The bench should be usable in the simplest form as soon as we've checked it out, but there are some things we can do to make the best of it. There's a need for a handful of plumbing and electrical accessories. | The bench should be usable in the simplest form as soon as we've checked it out, but there are some things we can do to make the best of it. There's a need for a handful of plumbing and electrical accessories. | ||
| Line 14: | Line 16: | ||
** I think it can fit next to the sink in the place of the metal cabinet that is there currently - it may be a bit longer and deeper but that shouldn't be a problem. Ideally it'd be nice to keep the sink for other chemical type experiments. If we can avoid talking about the darkroom then we can save ourselves a lot of hassle :-) -- Elliot. | ** I think it can fit next to the sink in the place of the metal cabinet that is there currently - it may be a bit longer and deeper but that shouldn't be a problem. Ideally it'd be nice to keep the sink for other chemical type experiments. If we can avoid talking about the darkroom then we can save ourselves a lot of hassle :-) -- Elliot. | ||
* It would be nice to have power without using the extension lead. The existing ring main might be extended fairly easily to put sockets on the wall near the sink. | * It would be nice to have power without using the extension lead. The existing ring main might be extended fairly easily to put sockets on the wall near the sink. | ||
| + | |||
| + | ==Model== | ||
| + | ==Instructions== | ||
Revision as of 08:40, 18 March 2011
Status
We are currently planning on fixing-up the unit and working out how it should be configured:
The bench should be usable in the simplest form as soon as we've checked it out, but there are some things we can do to make the best of it. There's a need for a handful of plumbing and electrical accessories.
Usage configuration
- Since it's already stained there's no problem in putting ferric chloride in it if we have some available (it needs 5 litres but 3 or 4 would do).
- We can use a spare tank to start brewing the cupric chloride if we want to do that
- I (artag) have some of Mega's good developer I can use to set up a development tank
- I have some date-expired mask stripper we can try in a strip tank
- Mega also sell some ferric chloride cleaner at £16 for a kg. Might be worth a go.
Placement
- We need water and waste connections for the rinse tanks. These are simple washing machine fittings but we may need adapters for the supply pipework and a waste hose. I do have some plumbing fittings but we may need more.
- Where do we put it ? I suggested replacing the unit 23 sink, but short-term it could simply go next to it. Tools may need moving, though. Or it could be installed in the unit 23 toilet. Or it could be integrated into a darkroom build. Discuss ..
- I think it can fit next to the sink in the place of the metal cabinet that is there currently - it may be a bit longer and deeper but that shouldn't be a problem. Ideally it'd be nice to keep the sink for other chemical type experiments. If we can avoid talking about the darkroom then we can save ourselves a lot of hassle :-) -- Elliot.
- It would be nice to have power without using the extension lead. The existing ring main might be extended fairly easily to put sockets on the wall near the sink.
