Difference between revisions of "Equipment/Staubli"
m (Link correction) |
|||
| (43 intermediate revisions by 4 users not shown) | |||
| Line 1: | Line 1: | ||
| − | |||
| − | |||
{{EquipmentInfobox | {{EquipmentInfobox | ||
|name=Staubli robot arm <!-- Name of the item. --> | |name=Staubli robot arm <!-- Name of the item. --> | ||
| Line 7: | Line 5: | ||
|category=Equipment <!-- Main category. Please leave alone to keep item in this category --> | |category=Equipment <!-- Main category. Please leave alone to keep item in this category --> | ||
|subcat=Robotics <!-- Sub-category if one exists. Please check main listing to see other categories contained within the main one --> | |subcat=Robotics <!-- Sub-category if one exists. Please check main listing to see other categories contained within the main one --> | ||
| − | |status= | + | |status=Under construction |
| − | |||
| − | |||
|reqtraining=Yes<!-- Is training required to use this equipment? Yes or no. --> | |reqtraining=Yes<!-- Is training required to use this equipment? Yes or no. --> | ||
|trainlink=<!-- If training is required, provide a link to training signup or contact page. Otherwise leave blank. --> | |trainlink=<!-- If training is required, provide a link to training signup or contact page. Otherwise leave blank. --> | ||
| − | | | + | |acnode=no |
| − | |owner= | + | |owner=Robotics group<!-- Provide a link to owners members page if other than LHS --> |
|origin=Donation<!-- If via pledge, please link to the completed pledge page on the wiki --> | |origin=Donation<!-- If via pledge, please link to the completed pledge page on the wiki --> | ||
| − | + | |maintainers=Dean, padski, JonRussell <!-- NO LINKS PLEASE; it currently breaks the template. If someone is nominated as managing the upkeep of this item, please list them here. --> | |
| − | |maintainers= | ||
|template_ver=1.1 <!-- Please do not change. Used for tracking out-of-date templates --> | |template_ver=1.1 <!-- Please do not change. Used for tracking out-of-date templates --> | ||
}} | }} | ||
| − | + | __NOTOC__ | |
| − | Kindly donated to us by Queen Mary's | + | Kindly donated to us by Queen Mary University's School of Electronic Engineering & Computer Science was missing arm and power cables. |
| − | |||
| − | |||
| − | |||
| − | |||
| − | |||
| − | |||
| − | |||
| − | |||
| − | |||
| − | |||
| − | |||
| − | |||
| − | |||
| − | |||
| − | |||
| − | |||
== Status == | == Status == | ||
| − | + | The arm is currently a work in progress. It is driven by an open source controller due to failure of the original controller however we still need to complete the kinematics for it | |
<br> | <br> | ||
| Line 50: | Line 29: | ||
** Masse kg 42Kg | ** Masse kg 42Kg | ||
| − | * | + | * STMBL |
| − | ** Type | + | ** Type 4.1 |
| − | ** | + | ** The STMBL along with Messa cards driven by linuscnc have been used to control the arm, massive support has been received from the open source community (STMBL and LinuxCNC) as well as Messa who did a custom firmware reactivity for us while we were having a hack weekend - great international and multidisciplinary team work. |
| − | + | ||
| − | + | <gallery> | |
| + | stmblbox.jpg|STMBL Case | ||
| + | STMBLTEAM.jpg|Hackspace, STMBL and Linuxcnc Team | ||
| + | </gallery> | ||
| + | |||
| + | We have movement | ||
| + | https://flic.kr/p/21GzpWj | ||
[https://www.dropbox.com/sh/3f2cdk8zv61xskm/sqK9HMZb1_ Some photos/videos of the beast] | [https://www.dropbox.com/sh/3f2cdk8zv61xskm/sqK9HMZb1_ Some photos/videos of the beast] | ||
| − | + | There is a 19 way cable running inside the arm, to allow external signals to be routed to the end effector. This uses a 19 way plug on the wrist joint and base called a [[Equipment/Staubli/BinderConnector|Binder Connector]]. | |
| − | |||
| − | |||
| − | |||
| − | |||
| − | |||
| − | |||
| − | |||
| − | |||
| − | |||
| − | |||
| − | |||
| − | |||
| − | |||
| − | + | There is a [[Equipment/Staubli/J11|50 way connector (J11)]] at the back of the controller containing the digital IO lines. | |
| − | + | == TODO == | |
| + | * Necessary | ||
| + | ** <s>One.</s> | ||
| − | + | * Nice to have | |
| + | ** <s>two .</s> | ||
| − | [ | + | == Docs/Links == |
| + | [[Equipment/Staubli/gcode_demos|Gcode demos]] | ||
| − | [ | + | [[media:StaubliStartStop.pdf|Robot startup/shutdown procedure]] |
| − | [https:// | + | [https://www.dropbox.com/s/i0lw46lhj2pszak/D28046300A.pdf Technical manual with schematics] |
| − | [https:// | + | [https://www.dropbox.com/s/oqp4sriv2i3i4nv/D28045004E.pdf Arm Manual] |
| − | [https://www.dropbox.com/s/ | + | [https://www.dropbox.com/s/d8w0m5gdf8hc4sn/UserManual_CS7M_Jul97_V0.0_EN.pdf CS7 User Guide] |
| − | [https://www.dropbox.com/s/ | + | [https://www.dropbox.com/s/8b85uvchuihzdbb/ElectricalCS7.pdf CS7 Electrical Diagrams] |
[https://docs.google.com/spreadsheet/ccc?key=0AqarnpYKaciedFZjTUg4eWd6TDJhblh1UU9xUjFZSWc&usp=sharing Padski's Cable Schematic] | [https://docs.google.com/spreadsheet/ccc?key=0AqarnpYKaciedFZjTUg4eWd6TDJhblh1UU9xUjFZSWc&usp=sharing Padski's Cable Schematic] | ||
| − | |||
| − | |||
| − | |||
| − | |||
| − | |||
| − | |||
[[Equipment/Staubli/Controller|The Linux setup on the ARM controller board]] | [[Equipment/Staubli/Controller|The Linux setup on the ARM controller board]] | ||
| − | |||
| − | |||
| − | |||
Revision as of 23:45, 31 March 2019
| Staubli robot arm | |
|---|---|
 | |
| Model | RX60L |
| Sub-category | Robotics |
| Status | Under construction |
| Last updated | 4 August 2022 21:26:32 |
| Training requirement | Yes |
| ACnode | no |
| Owner | Robotics group |
| Origin | Donation |
| Maintainers | Dean, padski, JonRussell |
Kindly donated to us by Queen Mary University's School of Electronic Engineering & Computer Science was missing arm and power cables.
Status
The arm is currently a work in progress. It is driven by an open source controller due to failure of the original controller however we still need to complete the kinematics for it
Specs
- Robot arm
- Type: RX60L
- Reference/machine number: 597411 - 01
- Fabrication Le F - 12 - 1997
- Masse kg 42Kg
- STMBL
- Type 4.1
- The STMBL along with Messa cards driven by linuscnc have been used to control the arm, massive support has been received from the open source community (STMBL and LinuxCNC) as well as Messa who did a custom firmware reactivity for us while we were having a hack weekend - great international and multidisciplinary team work.
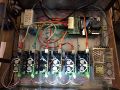
STMBL Case
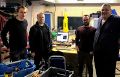
Hackspace, STMBL and Linuxcnc Team


We have movement https://flic.kr/p/21GzpWj
Some photos/videos of the beast
There is a 19 way cable running inside the arm, to allow external signals to be routed to the end effector. This uses a 19 way plug on the wrist joint and base called a Binder Connector.
There is a 50 way connector (J11) at the back of the controller containing the digital IO lines.
TODO
- Necessary
One.
- Nice to have
two .
Docs/Links
Robot startup/shutdown procedure