Difference between revisions of "Equipment/VinylCutterOld"
| Line 1: | Line 1: | ||
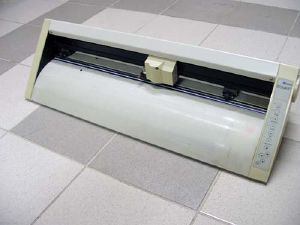
[[File:Roland (Large).jpg|thumb|right]] | [[File:Roland (Large).jpg|thumb|right]] | ||
==Status== | ==Status== | ||
| − | I have had a certain amount of success running the cutter with a serial connection from Inkscape under Linux. More messing around is needed.--[[User:Artag|Artag]] 13:32, 19 August 2010 (UTC) | + | * I have had a certain amount of success running the cutter with a serial connection from Inkscape under Linux. More messing around is needed.--[[User:Artag|Artag]] 13:32, 19 August 2010 (UTC) |
| + | * I have gotten the cutter to reliably cut reasonably complex shapes (see image to the right). See http://github.com/muz/Ruby-PNC950. Looks like the serial port needed negotiating correctly.--[[User:Muz|Muz]] 20 August 2010. | ||
==Model== | ==Model== | ||
* Roland CAMM-1 PNC-950. [http://www.signcutpro.com/files/man/roland/pnc950.pdf PDF manual], [http://support.rolanddga.com/Docs/Documents/departments/Product%20Management/Product%20Information/Specialty%20Products/PNC950_FAQ.pdf FAQ]. | * Roland CAMM-1 PNC-950. [http://www.signcutpro.com/files/man/roland/pnc950.pdf PDF manual], [http://support.rolanddga.com/Docs/Documents/departments/Product%20Management/Product%20Information/Specialty%20Products/PNC950_FAQ.pdf FAQ]. | ||
| Line 10: | Line 11: | ||
==Instructions== | ==Instructions== | ||
====Quick setup guide==== | ====Quick setup guide==== | ||
| − | * Set inkscape to | + | * Set inkscape to HPGL output. File > Save As > HPGL format. |
| − | * | + | * Draw your figure. |
| − | * | + | * Connect the cutter via USB to Lovelace. This is done with a serial port converter from 25-pins -> 9-pins -> USB. |
| − | + | * Load vinyl, making sure that it is flush with the left edge and has some slack for being pulled to and fro. | |
| − | * | + | * Turn on the cutter, the cutter head should fly to the right edge. |
| − | * | + | * Press Setup, cutter parks at left. |
| − | * | + | * Move cutter if necessary with cursor buttons, press Origin Set to mark lower right corner of drawing |
| + | * Run '~/serialshite.rb <HPGL filename>' from a Terminal. | ||
It should be possible to enable the serial port as a printer and print direct to it, but I found this produced cutter errors (flashing power light) and no cut. | It should be possible to enable the serial port as a printer and print direct to it, but I found this produced cutter errors (flashing power light) and no cut. | ||
| − | The following file was generated by | + | The following file was generated by inkskape for a star shape. This works. |
IN; | IN; | ||
| Line 36: | Line 38: | ||
PD3999,6429; | PD3999,6429; | ||
PD3999,6429; | PD3999,6429; | ||
| + | |||
| + | ====Creating Images for Cutting==== | ||
| + | '''Converting an existing SVG''' | ||
| + | |||
| + | For some reason, Inkscape doesn't like going straight from SVG to HPGL. This can be fixed by: | ||
| + | * Open up the SVG file | ||
| + | * File > Save As > select the DXF file format. | ||
| + | * Open the DXF | ||
| + | * File > Save As > HPGL | ||
| + | |||
| + | '''Creating your own image in Inkscape''' | ||
| + | |||
| + | Inkscape seems to play nicely if you just create a new image and lay down some paths or polygons of your own. You can save this data for the cutter by just going to File > Save As > HPGL | ||
| + | |||
| + | '''Avoiding overloading the cutter with TOO MUCH DATA''' | ||
| + | |||
| + | The cutter doesn't seem to happy when it recieves a large set of instructions in one fell swoop. As such, it is highly recommended that you format your HPGL files nicely. | ||
| + | * vim yourhpglfile.hpgl | ||
| + | * <Esc> | ||
| + | * :% s/;/;<C-x><C-m>/g | ||
| + | * <Return> | ||
| + | * :wq | ||
| + | |||
| + | This will place each command on its own line, and in the case of more complex drawing patterns, avoid having the cutter throw a hissy fit and get confused. | ||
==Tips== | ==Tips== | ||
| Line 62: | Line 88: | ||
==Consumables== | ==Consumables== | ||
There is a [[Pledges/Vinyl|pledge]] running for the purchase of more vinyl. | There is a [[Pledges/Vinyl|pledge]] running for the purchase of more vinyl. | ||
| − | |||
| − | |||
| − | |||
| − | |||
| − | |||
| − | |||
| − | |||
| − | |||
| − | |||
| − | |||
| − | |||
| − | |||
| − | |||
| − | |||
| − | |||
| − | |||
| − | |||
| − | |||
| − | |||
| − | |||
| − | |||
| − | |||
| − | |||
| − | |||
| − | |||
| − | |||
| − | |||
| − | |||
| − | |||
| − | |||
Revision as of 11:06, 21 August 2010
Status
- I have had a certain amount of success running the cutter with a serial connection from Inkscape under Linux. More messing around is needed.--Artag 13:32, 19 August 2010 (UTC)
- I have gotten the cutter to reliably cut reasonably complex shapes (see image to the right). See http://github.com/muz/Ruby-PNC950. Looks like the serial port needed negotiating correctly.--Muz 20 August 2010.
Model
- Roland CAMM-1 PNC-950. PDF manual, FAQ.
Specifications
- It holds up to 610mm (24") media and cuts up to 584mm ( ~23").
- Length is essentially unlimited as it can use roll-feed media but seems to be restricted to 25m.
Instructions
Quick setup guide
- Set inkscape to HPGL output. File > Save As > HPGL format.
- Draw your figure.
- Connect the cutter via USB to Lovelace. This is done with a serial port converter from 25-pins -> 9-pins -> USB.
- Load vinyl, making sure that it is flush with the left edge and has some slack for being pulled to and fro.
- Turn on the cutter, the cutter head should fly to the right edge.
- Press Setup, cutter parks at left.
- Move cutter if necessary with cursor buttons, press Origin Set to mark lower right corner of drawing
- Run '~/serialshite.rb <HPGL filename>' from a Terminal.
It should be possible to enable the serial port as a printer and print direct to it, but I found this produced cutter errors (flashing power light) and no cut.
The following file was generated by inkskape for a star shape. This works.
IN;
SP1;
PU3999,6429;
PD2693,5186;
PD929,5557;
PD1707,3932;
PD809,2369;
PD2596,2606;
PD3805,1269;
PD4131,3042;
PD5776,3778;
PD4191,4636;
PD3999,6429;
PD3999,6429;
Creating Images for Cutting
Converting an existing SVG
For some reason, Inkscape doesn't like going straight from SVG to HPGL. This can be fixed by:
- Open up the SVG file
- File > Save As > select the DXF file format.
- Open the DXF
- File > Save As > HPGL
Creating your own image in Inkscape
Inkscape seems to play nicely if you just create a new image and lay down some paths or polygons of your own. You can save this data for the cutter by just going to File > Save As > HPGL
Avoiding overloading the cutter with TOO MUCH DATA
The cutter doesn't seem to happy when it recieves a large set of instructions in one fell swoop. As such, it is highly recommended that you format your HPGL files nicely.
- vim yourhpglfile.hpgl
- <Esc>
- :% s/;/;<C-x><C-m>/g
- <Return>
- :wq
This will place each command on its own line, and in the case of more complex drawing patterns, avoid having the cutter throw a hissy fit and get confused.
Tips
- Sometimes the cutter refuses to print or respond to any buttons. This hasn't happened since I opened a door in the bottom of the printer and poked an EPROM there, so may be due to some poor internal connection.
Serial cable
The serial cable (blue, with a 25WD at one end and a 9WD at the other) is connected as follows :
| Cutter, 25 pin male D | PC, 9 pin female D | Use |
| pin 2 | pin 2 | PC RXD from cutter |
| 3 | 3 | PC TXD to cutter |
| 4 | n/c | cutter pin 5, RTS CTS loopback |
| 5 | n/c | cutter pin 4, RTS CTS loopback |
| 7 | 5 | ground |
| 20 | 8 | cutter DTR to PC CTS, flowcontrol |
This provides for hardware (rts/cts) handshake. Software flowcontrol may be OK but the cutter manual suggests overrun may occur.
Consumables
There is a pledge running for the purchase of more vinyl.

