Difference between revisions of "Project:OneStringGuitar"
Dylanbeattie (talk | contribs) |
Dylanbeattie (talk | contribs) |
||
| Line 1: | Line 1: | ||
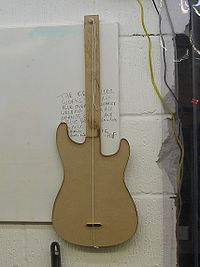
| − | A really easy, simple one-string guitar, that anyone should be able to build in an afternoon, that'll utilise a couple of basic woodworking techniques and give you something personal and unique to take home at the end of the day. Might be good for Young Hackspace woodworking events or anyone looking to do their very first bit of woodworking. | + | [[File:guitar.jpg|200px|thumb|right|The One-String Guitar]]A really easy, simple one-string guitar, that anyone should be able to build in an afternoon, that'll utilise a couple of basic woodworking techniques and give you something personal and unique to take home at the end of the day. Might be good for Young Hackspace woodworking events or anyone looking to do their very first bit of woodworking. |
If you want to do this over two workshops, you can cut, finish and paint the body at the first session, and then attach the neck and string during the second once the paint is dry. | If you want to do this over two workshops, you can cut, finish and paint the body at the first session, and then attach the neck and string during the second once the paint is dry. | ||
Latest revision as of 22:07, 6 March 2011
A really easy, simple one-string guitar, that anyone should be able to build in an afternoon, that'll utilise a couple of basic woodworking techniques and give you something personal and unique to take home at the end of the day. Might be good for Young Hackspace woodworking events or anyone looking to do their very first bit of woodworking.
If you want to do this over two workshops, you can cut, finish and paint the body at the first session, and then attach the neck and string during the second once the paint is dry.
Photos of the prototype build for this are at http://www.flickr.com/photos/dylanbeattie/sets/72157626210764652/with/5504023280/
Ingredients
- 1# 4-5mm MDF, plywood or hardboard, roughly A3 sized
- 1# piece of planed wood - anything, really - about 4-5cm wide, 1-2 cm thick and 1m long or so.
- 1# piece of 8-10m dowel, approx 3-4 cm long.
- A couple of small panel pins
- A screw.
- A 2-3mm x 10mm x 20mm bit of anything - plywood, steel, aluminium - to act as a bridge.
- A bit of string.
Instructions
First, design the body. Make sure you leave a central strip intact to nail it to the "neck", but you can go crazy with the rest of it - curves, points, whatever you like.
Once that's done, cut it out (this is either a great opportunity to demo the laser cutter, OR a good place to learn to use a coping saw!)
Nail the body onto the neck - the neck will sit behind the body once you're done. Make sure there's no exposed nail-ends sticking through the back - if there are, hammer them flat or round them off with a file. (If you have more time, you might want to glue the body to the neck instead)
Carefully cut a notch 1cm deep into one end of the dowel.
Drill a hole into the endgrain of the neck, at the body end, then screw the screw into this, leaving 2-3mm proud to loop the screw around.
Drill an 8-10mm hole (match the dowel you're using) through the top end of the neck, then push the dowel, notch-side-up, into the hole at the top of the neck.
To string the guitar, tie a loop in one end of the string, hook it over the screw, stretch it taut along the neck, notch it into the notch on the peg, and then turn the tuning peg. The bridge should sit on the front of the body, held in place by the tension of the string.
