Difference between revisions of "Projects/Scooter Roof"
| Line 183: | Line 183: | ||
===Road test=== | ===Road test=== | ||
| − | < | + | <br> |
| − | + | {{#ev:youtube|q8Itp0R9z1g}} | |
| − | |||
| − | |||
| − | |||
The roof has met or exceeded all my expectations. The tig-welded frame and plastic windscreen/roof combo has proved light and stiff enough to make almost no change to the handling of the bike. The mounting points have proved more than strong enough to hold the frame steady, even through the roughest potholes that London can throw at it. There are no rattles from the frame at all. | The roof has met or exceeded all my expectations. The tig-welded frame and plastic windscreen/roof combo has proved light and stiff enough to make almost no change to the handling of the bike. The mounting points have proved more than strong enough to hold the frame steady, even through the roughest potholes that London can throw at it. There are no rattles from the frame at all. | ||
Revision as of 10:19, 6 February 2016
Background
I have been riding motorcycles for about 30 years and over the past 5 years have been commuting into work in central London on a daily basis, originally I used my Honda VFR750.
It became quickly apparent to me that the motorcycles are not best suited for city commuting and scooters are a better option for a number of reasons.
- No need to continually chnage gears (the VFR clutch is very heavy!)
- Far better weather protection
- The ability to use an apron reducing the requirement for trouser protection
- Small scooter engines warm up more quickly and don't use as much petrol
- More upright, comfortable riding position allowing easier rear visibility
In addition to moving to a scooter for transportation I was also interested in increasing the amount of weather protection available which would reduce the amount of wet weather gear required for rainy/cold weather and so reviewed the various options.
Existing roofed and windscreened scooters
Honda Gyro Canopy
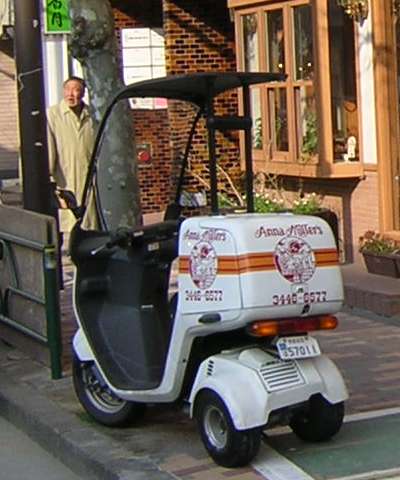
Honda have been selling these tilting 3 wheel scooters for many years in Japan. While I would be very keen to try one of these, there are very few in England and the logistics of importing one from Japan and maintaining it with poor availability of spares made me wary of continuing with this avenue. They only have 50cc engines so performance would be pretty poor too.
XingYue XY150

I owned one of these Chinese clones of the Honda Gyro, but found the build quality and road holding of these machines to be disappointing.
BMW C1

Many people use these roofed scooters, which were only sold for a couple of years around 2000. The concept is that the rider sits in a safety cell, held in place with safety belts. In many countries riders are not required to wear crash helmets while riding C1s but this exemption is not available in the UK. I haven't tried a C1, but they have a reputation for being top heavy, which is probably due to the weight of the glass windscreen and strong roof. Given that I will be doing a lot of traffic filtering this put me off a bit.
Benelli Adiva 150
These Italian machines are rare in England. They are convertibles with a retractable roof. With optional clear side fairings surrounding the windscreen they provide fantastic weather protection, and the plastic windscreen is much lighter than the BMW C1's glass equivalent. The Adiva also has a lot of storage space in the rear luggage compartment. I own a Benelli Adiva which I enjoy riding, but there are some disadvantages.
- The 150 engine only allows speeds up to around 50 mph.
- A two wheeled configuration in a relatively light scooter (135kg) means that the Adiva is susceptible to cross winds at speeds.
- The tall narrow profile of the Adiva means that it is highly susceptible to being knocked over, and I have found my Adiva on the ground on many occaisions, which is a real problem when you are parking in London motorcycle bays.
Adiva AD200/250
These updates on the Adiva concept were produced from 2007 and answered went a long way to answering the lack of power of the original 150 Benelli version. The AD200/250 have never been sold in the UK so once again, while I considered buying one in Italy where they are more common, the cost and logistics of bringing one back to England did not appeal.
Adiva AD3

A relatively recent addition to the family of roofed scooters the AD3 helped improve the cross-wind stability of the original 2-wheel Adivas. Unfortunately they are expensive and once again not available in England. I would be very interested in riding one of these machines as they tick almost all the boxes for power, stability and weather protection.
So while relatively pleased with my Benelli Adiva which I used for a number of years it occured to me that perhaps the ultimate solution would be to place a roof on a Gilera Fuoco 500. The three wheel configuration and 250kg weight would provide the cross-wind stability, while the lack of plastic covering compared to other scooters would allow for mounting points.
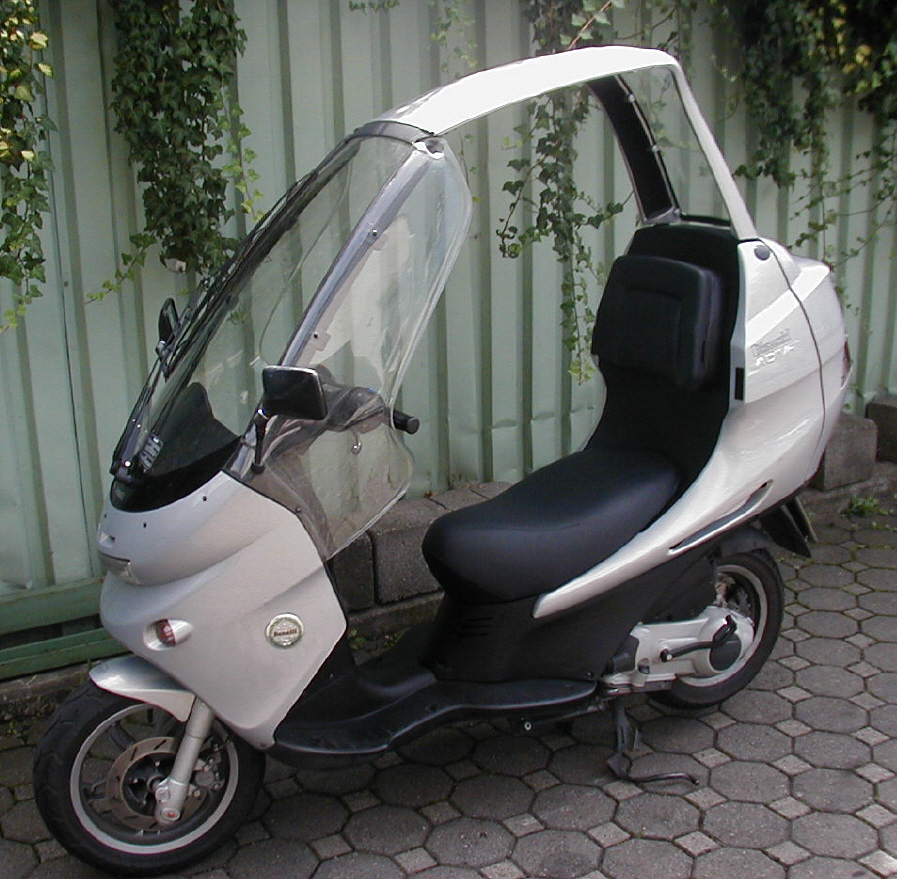
Piaggio MP3 with Isotta roof system

Isotta of Italy produce a full windscreen and roof system for around €500. I did consider modifying one of these kits to fit my Fuoco. Isotta don't sell the system in England so I even made an impromptu visit to their factory in Bologna to discuss buying the kit. However, getting the kit back to England would be very expensive to mail, and I still would have the issue of fitting a windscreen wiper/washer combination, and mounting helmet-level rear-view mirrors, which made me hesitate before purchasing.
Piaggio MP3 with Comfort Windscreen

This effort to increase weather protection is interesting, using a very large screen but without providing protection right over your head, and relying on a front-only mounting system. I have never tried an MP3 with this type of windscreen but I suspect that a lack of wiper will make visibility pretty poor when it rains, and the front-only mounting system will mean that there is a lot of whip at the top of the windscreen on uneven roads.
Scodiam Vestratis

This is a very interesting offering, from a young company in France. It uses a glass windscreen which will be good for scratch resistance. Not sure if the roof and structure is steel or aluminium. I believe that it weights about 32kg. The roof is available on Amazon in the UK for £1260 including delivery. If they could lose some weight on this option I think they would be more marketable..
Honourable mentions
I came across this bike in London with a home-mounted windscreen wiper on the comfort windscreen mentioned above. Could do with a bit of a clean though!
Designing the roof
After considering the options on the market I found that that none covered all my requirements. Round this time I had the opportunity to buy a second-hand 2007 Gilera Fuoco at a reasonable price. To me this was just about the perfect base for a roof project.
- A proven 3 wheel tilting system for stability
- Limited plastic coverings allowing for easy attaching of the roof to existing mounting points front and rear,
- The ability to lock the suspension in the upright position when stationary at traffic lights, making it easy to hold the bike upright in windy conditions.
- A heavyweight motorcycle which isn't going to be blown around
- A reasonable power/weight ratio
From the start I was keen to weld the frame and avoid bolted connections, any bolted connections would increase the risk of excessive rattling and squeaking over rough roads. While it would be easier to weld a steel frame using MIG techniques, the frame would require painting before use. The requirement to paint the frame before regular use would mean that further welding would be very difficult without having to remove the paint, an ardous process. I also assumed that weight could also be an issue, but have never attempted to estimate weight for a steel version of the roof frame.
I therefore decided to use aluminium for the frame, the advantages of aluminium is both that it is light and naturally corrosion resistant. This meant that I had to develop my aluminium welding skills, a process which took several months before I felt confident enough that I could attempt the frame itself.
I chose a think-walled 1" aluminium tube for the main frame tubing. The advantage of the thick wall is that it reduces flex, but this comes at a price of reduced malleability, a problem which I'll come back to.
Mounting points
I was lucky to pick up a second hand windscreen and mounting frame for the fuoco, which allowed me to copy and weld up a new mounting block with the correct screw mounting positions and angles which would fit into the existing screw holes in front of the Fuoco steering gear. I was unsure if these mounting points would be strong enough to hold the roof stable against lateral force such as cornering and wind gusts and had it in the back of my mind that I would also need to extend the mounting points to bolt down to further screw holes which are normally used to mount the covers for the dashboard.
For the rear mounting points I could simply use the existing mounting points available for a rear pannier. Given that these mounting points were designed to carry around 20+ kilos of pannier and luggage, I was pretty confident that the mounting points would be strong and stiff enough to hold the roof stiff enough.
Windscreen
The main considerations in choosing a design for the windscreen were
- Size
The windscreen needed to be large enough to provide adequate protection from wind and rain. The windscreen also needs to be thick enough to provide sufficient rigidity. The main consideration here is either to have a windscreen material which can provide enough stiffness itself, or have a thinner, lighter screen which needs a frame to support it.
- Material
The main choice here is either to use glass, persepex or polycarbonate. While glass provides excellent scratch resistance it is very difficult to form in a one-off situation, it would be very heavy, and a laminated screen would be essential for safety reasons. The choice then comes down either to Perspex or Polycarbonate. Polycarbonate have many advantages over glass and perspex alternatives.
Polycarbonate is much lighter than glass Polycarbonate is shatter resistant, unlike perspex, glass and other acrylic derivatives. Polycarbonate is 250x stronger than glass and considerably stronger than Perspex However, Polycarbonate has very low scratch resistance unless it is coated with a scratch resistant covering
Scratch resistance is a big consideration given that I wanted to use a windscreen wiper on my screen. My Benelli Adiva has a plastic windscreen which resisted scratches very well, but I think that it must have had some kind of coating on it, the downside was that it wasn't possible to polish scratches out of the surface.
I again had my decision made for me in that I was able to acquire a second-hand comfort windscreen in good condition at a very low cost. I based my design on the use of that windscreen, although the scratch resistance of this windscreen is not as good as the Benelli Adiva windscreen. I think that there may be pro's a cons to having a perspex windscreen. I am going to see if I can polish out any scratches using 3M Marine Finesse-It II Finishing Cream as advised in BoatingMag.com. If that works then the scratching issue shouldn't be so much of a concern.
Windscreen wiper
The decision here was fairly easy as I already have experienced parallelogram windscreen wipers, so I was happy to obtain a second-hand wiper motor and arms from a scrapped bike. A custom set of mounting brackets were needed to mount the wiper.
The Build
Manufacturing the frame
I had chosen relatively thick walled aluminium tubing to make it easier to weld the joints without blowing through the tube ends. The downside to thick walled tubing was that I found it cracked if I bent it at two tight an angle on our pneumatic pipe bender. I tried to anneal the pipe before bending to see if I could reduce the cracking issue but found that it didn't make much difference. Since I've never tried this process before it may have been that I needed to experiment further with heating and cooling, but I found that I could just about get away with bending the tubing as much as I needed to form the frame without cracking the tubing.
All the coping joints were made by hand with an angle grinder which produced acceptable results and then TIG welded.
The frame is designed to be easily removable from the bike if it is not required for use in the summer. Two 8mm stainless steel bolts hold the frame to the subframe, which is held to the front by four 6mm stainless steel studs, and at the back to an aluminium subframe made of l-shaped extrusion bolted with more 6mm stainless steel studs and nyloc stainless steel bolts.
The windsreen is held onto the frame with 6mm stainless steel bolts, which fasten into threaded holes in welded lugs.
https://wiki.london.hackspace.org.uk/w/images/8/8c/Rearviewmirror.jpg%7Cframeless%7C200px
I welded lugs at eye-level to hold slightly convex mirrors on each side of the frame, which really help with visibility in rush hour traffic and dual carriageways.
The windscreen wiper motor
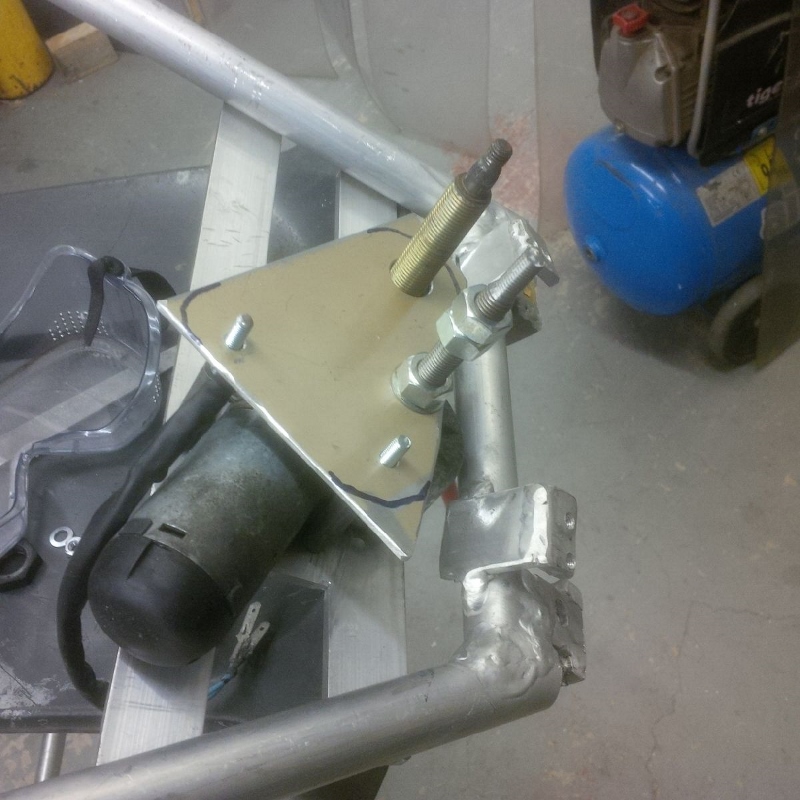
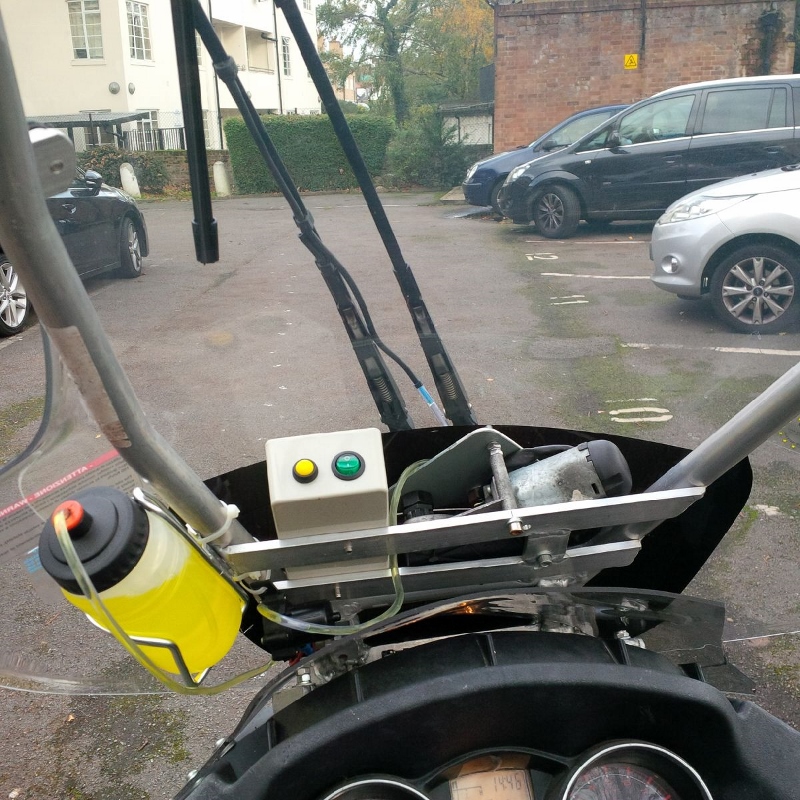
The windscreen wiper motor proved tricky to install, I had to take it apart to work out how the internal wiring worked to "park" the wiper in the correct position once power is removed from the main circuit. At the moment the wiper is wired only to work when the power is supplied and the parking circuit is disabled. I intend to upgrade the circuit to include the return to park function and operate this via a foot switch when I remove the remove the roof for an upgrade.
I had to manufacture a mount for the second wiper arm of the parallelogram. I did this by turning down the end of a large bolt on a lathe, and then cutting wiper end off, and using a bolt to rejoin the two halves of the original bolt. Since the wiper will never rotate more than about 60 degrees, it will be held captive by the bolt. The system has turned out to work very well.
The windscreen washer
I used an inexpensive washer pump along with a halfords bicycle water bottle and cage as a water reservoir, which work well. The only issue is that the water will siphon if the reservoir is higher than the nozzles, and the water will draw back into the reservoir if it is lower than the nozzles. This means that there is a bit of a lag between starting the pump and the jets working. I've ordered a no return valve which I'll fit to see if that will keep the liquid in the pipe and reducing the lag between power and working jets. If this works I'll reroute the washer bottle to a less obtrusive position, probably at the rear of the bike with the piping running up the frame to the front of the bike.
The idea along with the rest of the roof components is that everything stays attached to the roof, so it can be removed and stored very easily if it isn't used in the summer.
The power circuit
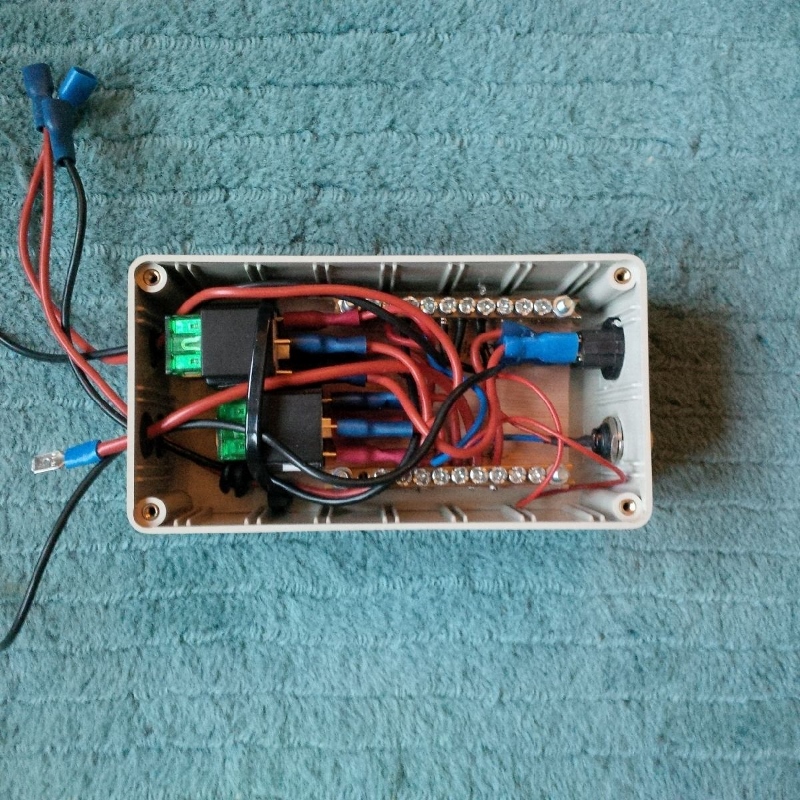
I used a little fuse piggy back tap to take a power feed from an existing switched fuse and used this to fire a relay which provides power to the wiper and washer when the ignition is switched on. I chose a circuit which wasn't crucial to the running of the bike in case it proved to be unreliable and failed while I was riding the bike. I was worried that somebody might switch the wiper on while the bike is parked and scratch up the windscreen/run down the battery so this is an important feature. The on off switches and relays for the wiper and washer switches are all contained within a small ABS project box mounted on the frame at the front next to the wiper motor which is quite neat. Its a little stretch to operate the wiper when moving, but since it is only necessary to operate occasionally it is not too annoying to do until I wire in a footswitch and park function.
I was surprised at how much space is required to wire in the switches and relays for the power circuit. The first ABS box I tried to use wasn't big enough to get everything in. I found that the easiest way to wire all different wires into positive and earth was to use two brass earth blocks and connect the different wires.
All the circuits are fuse protected to make sure that there is no possibility of fire if any of the wires short circuit. To keep things neat I used relays with integrated fuses rather than separate fuse blocks.
The roof/canopy
Originally I had intended to form a roof out of aluminium, but then it occured to me that I could use a motorcycle cruiser=style windshield for the roof. I picked up one for about 20 quid second hand and it is just about a perfect fit in terms of stiffness, shape and size. It also gives the bike a rather good profile.
Getting on the road
Insurance
I discussed the roof with my insurance company to make sure that they were ok with it before taking it out on the road. They were happy to continue insuring it, and just wanted confirmation that the roof did not increase the value of the bike. They even sent me a letter to confirm that they were aware of the roof.
MOT vehicle test
The company which does my MOT test were happy to confirm that the roof was roadworthy and issue a new MOT with the roof fitted.
Road test
{{#ev:youtube|q8Itp0R9z1g}}
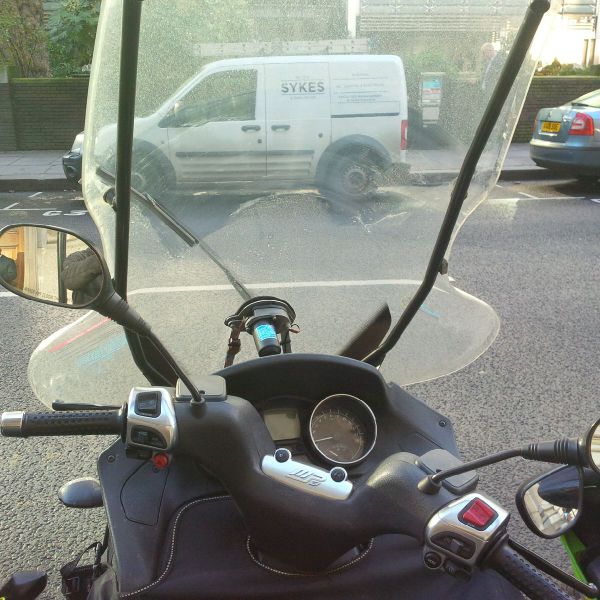
The roof has met or exceeded all my expectations. The tig-welded frame and plastic windscreen/roof combo has proved light and stiff enough to make almost no change to the handling of the bike. The mounting points have proved more than strong enough to hold the frame steady, even through the roughest potholes that London can throw at it. There are no rattles from the frame at all. Visibility is still very good, the frame tubes and wiper arms do not obstruct sightlines. The eye-level rear view mirrors dramatically improve your awareness of vehicles behind you, which is essential when you are going through London rush-hour traffic. I have seen a bit of scratching on the perspex from the windscreen wiper, we'll see how my it degrades over time and if we can polish out scratches to increase the life of the windscreen. Apart from the very heaviest rain, you only need to operate the windscreen wiper on an intermittent basis. Until I wire the foot switch to operate the intermittent wipe function I am just switching the wiper on for a single wipe to clear when necessary. I have found that the London roads are too rough to have the windscreen on all the time, as there is too much bounce when going over potholes.
I have found that there is an element of misting of the plastic windscreen on cold mornings when there is a lot of dew around, it takes a while for this to clear even if you use the windscreen wiper as it reforms. I'm considering fitting a small electric fan to help clear the condensation, perhaps try a prototype to judge effectiveness, and then create a permanent mounting if it works well.