Difference between revisions of "Equipment/HPC LS3060 Laser Cutter/LogBook"
Jump to navigation
Jump to search
| Line 1: | Line 1: | ||
==Logbook== | ==Logbook== | ||
| + | |||
| + | ===30/09/2010 Operator [[User:Russ|Russ]]=== | ||
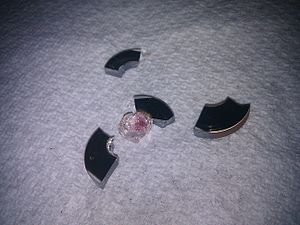
| + | [[File:Laser-mirror.jpg|300px|thumb|right|Exhibit 1: Melted Mirror]] | ||
| + | * I was called to the space due to a report of the laser not working. | ||
| + | * It turned out that the #2 mirror had melted. Likely because I left some residue on it while calibrating the beam (it's hard to see that mirror). | ||
| + | * New mirror ordered from HPC (~£50) | ||
| + | |||
===23/09/2010 Operator [[User:Solexious|Solexious]]=== | ===23/09/2010 Operator [[User:Solexious|Solexious]]=== | ||
* Cutter working well, no skipping of steps after Russ and I fixed an issue with the far right drive shaft. | * Cutter working well, no skipping of steps after Russ and I fixed an issue with the far right drive shaft. | ||
Revision as of 10:55, 5 October 2010
Logbook
30/09/2010 Operator Russ
- I was called to the space due to a report of the laser not working.
- It turned out that the #2 mirror had melted. Likely because I left some residue on it while calibrating the beam (it's hard to see that mirror).
- New mirror ordered from HPC (~£50)
23/09/2010 Operator Solexious
- Cutter working well, no skipping of steps after Russ and I fixed an issue with the far right drive shaft.
- The machine settings for speed of movement have been lowered to try to reduce drift during cutting.
19/09/2010 Operator Solexious
- After a failed attempt due to a slipping belt (probably the cause of the issues on the 18th), a money box was cut and assembled using the Box-o-Tron as a base for the dxf file.
- There is also a slight issue with focus of the laser, on 4mm acrylic settings of Speed 4 Power 100, at the side of the bed to the left it cuts perfectly, past 1/2 way to the right of the bed it fails to penetrate fully. A setting of Speed 5 Power 100 gives undesired blemishes from contact with the honey comb.
18/09/2010 Operator Meurig
- George cut some 2mm acrylic to make an enclosure for a robot.
- I created an XKCD plaque in copper using a two step (laser then chemical) process. These techniques will ultimatley be used to prototype PCBs. TBH, at this point the UV method is looking about as straightforward...
- We etched Aden's HTC G1 with pedobear, using Cut power 20, corner power 10 and speed 100.
- A Cthulu keyring was made on 2mm acrylic towards the end of the day. We did notice a few problems with this, namely at one point a hole came out non-circular, but also the etched layer didn't align correctly with the cut layer, out by about 2mm. No explanation for these at this point.
- I tried making a PCB, but should have used single sided copper.
16/09/2010 Operator Solexious
- Cut out the coin slot peices for the 4 in a row donations box
- Small bumps formed on the side of the acrylic closest to the bed where the honeycomb was touching, will try to correct with +1 to speed setting.
- Extraction is improved and unwanted smell is reduced with sheets of acrylic that are full bed size.
- No other problems detected.
15/09/2010 Operator Russ
- Cut some 1.5mm neoprene fairly successfully - needs high power and it's a bit smelly. (Settings in the book.)
- Circle issue is fixed. It was a problem with the tension on the frontmost X drive belt.
- Did some awesome etching onto black anodised aluminium - 450mm/sec, 90% power.
- We also built an acrylic box designed in qcad.
- Cut some hackspace keyrings, but noticed that the acrylic, when warm, warped upwards. Pause function worked as expected letting us tape down, but some ventilation sucking from below the bed would help a lot.
13/09/2010 Operator: samthetechie
Todo: Test CorelDraw X3 with 20mm circles on paper and compare to test using LaserCutter Software
12/09/2010 Operator: samthetechie
- Setup CorelDraw X3 with LaserCutter Add-on Toolbar.
- Cut Mic On Sign 3mm Perspex.
- Cut MusicMetric Sign 6mm MDF.
