Project:Sex typing with amelogenin
General
The general plan, with thanks to Maria, is: obtain dna samples, extract dna, pcr dna with amelogenin primers, and then run that on agarose gel.
There is still work that could be done, checking the legals, ethics and safety. eg: [1] [2] [3]
I figure we try to arrive at a definitive list of stuff (bill of materials) we need for the experiment, and source the bits we still need, perhaps avoiding unnecessary multiple delivery charges.
There is also a need to figure out how long this will all take and schedule it. The overall duration from start to finish is going to be quite long.
It might help to try out some parts, such as the extraction, before hand, although I don't see how we know whether that works until we run it through the rest. We could practise making gels, running a ladder on them, to figure out mixtures and timings and practise with detecting the dye.
Sampling
Current plan is to sterilise plastic sticks for consenting adult volunteers to rub inside their cheeks. Legally (I am so not a lawyer, and this is not legal advice), reading them a written spiel and getting their verbal agreement with witnesses and seeing them take the sample seems to be sufficient , although the suggestion has been made that a simple signed form might help avoid a possible problem with forgetful witnesses.
cotton swabs are another possible option.
Extraction
There are a number of written protocols out there
and a few videos on youtube
This seems to be the typical hackers version [6] which is basically soap to lyse the cells and then meat tenderiser as a protease and separation using alcohol. Reagents are all commonly available, so seems safe enough. will this will work with PCR?
Katherine Aull was boiling hers to get lysis and denature the proteins.
do we also need to do DNA precipitation? [7] why?
The sampling and extraction are crucial steps if the following steps are to work. dna contamination can be amplified in the pcr stage. there is a suggestion that there is an amount of black art in getting this to work well. It might repay the effort to try several different extractions and run them side by side for comparison.
PCR
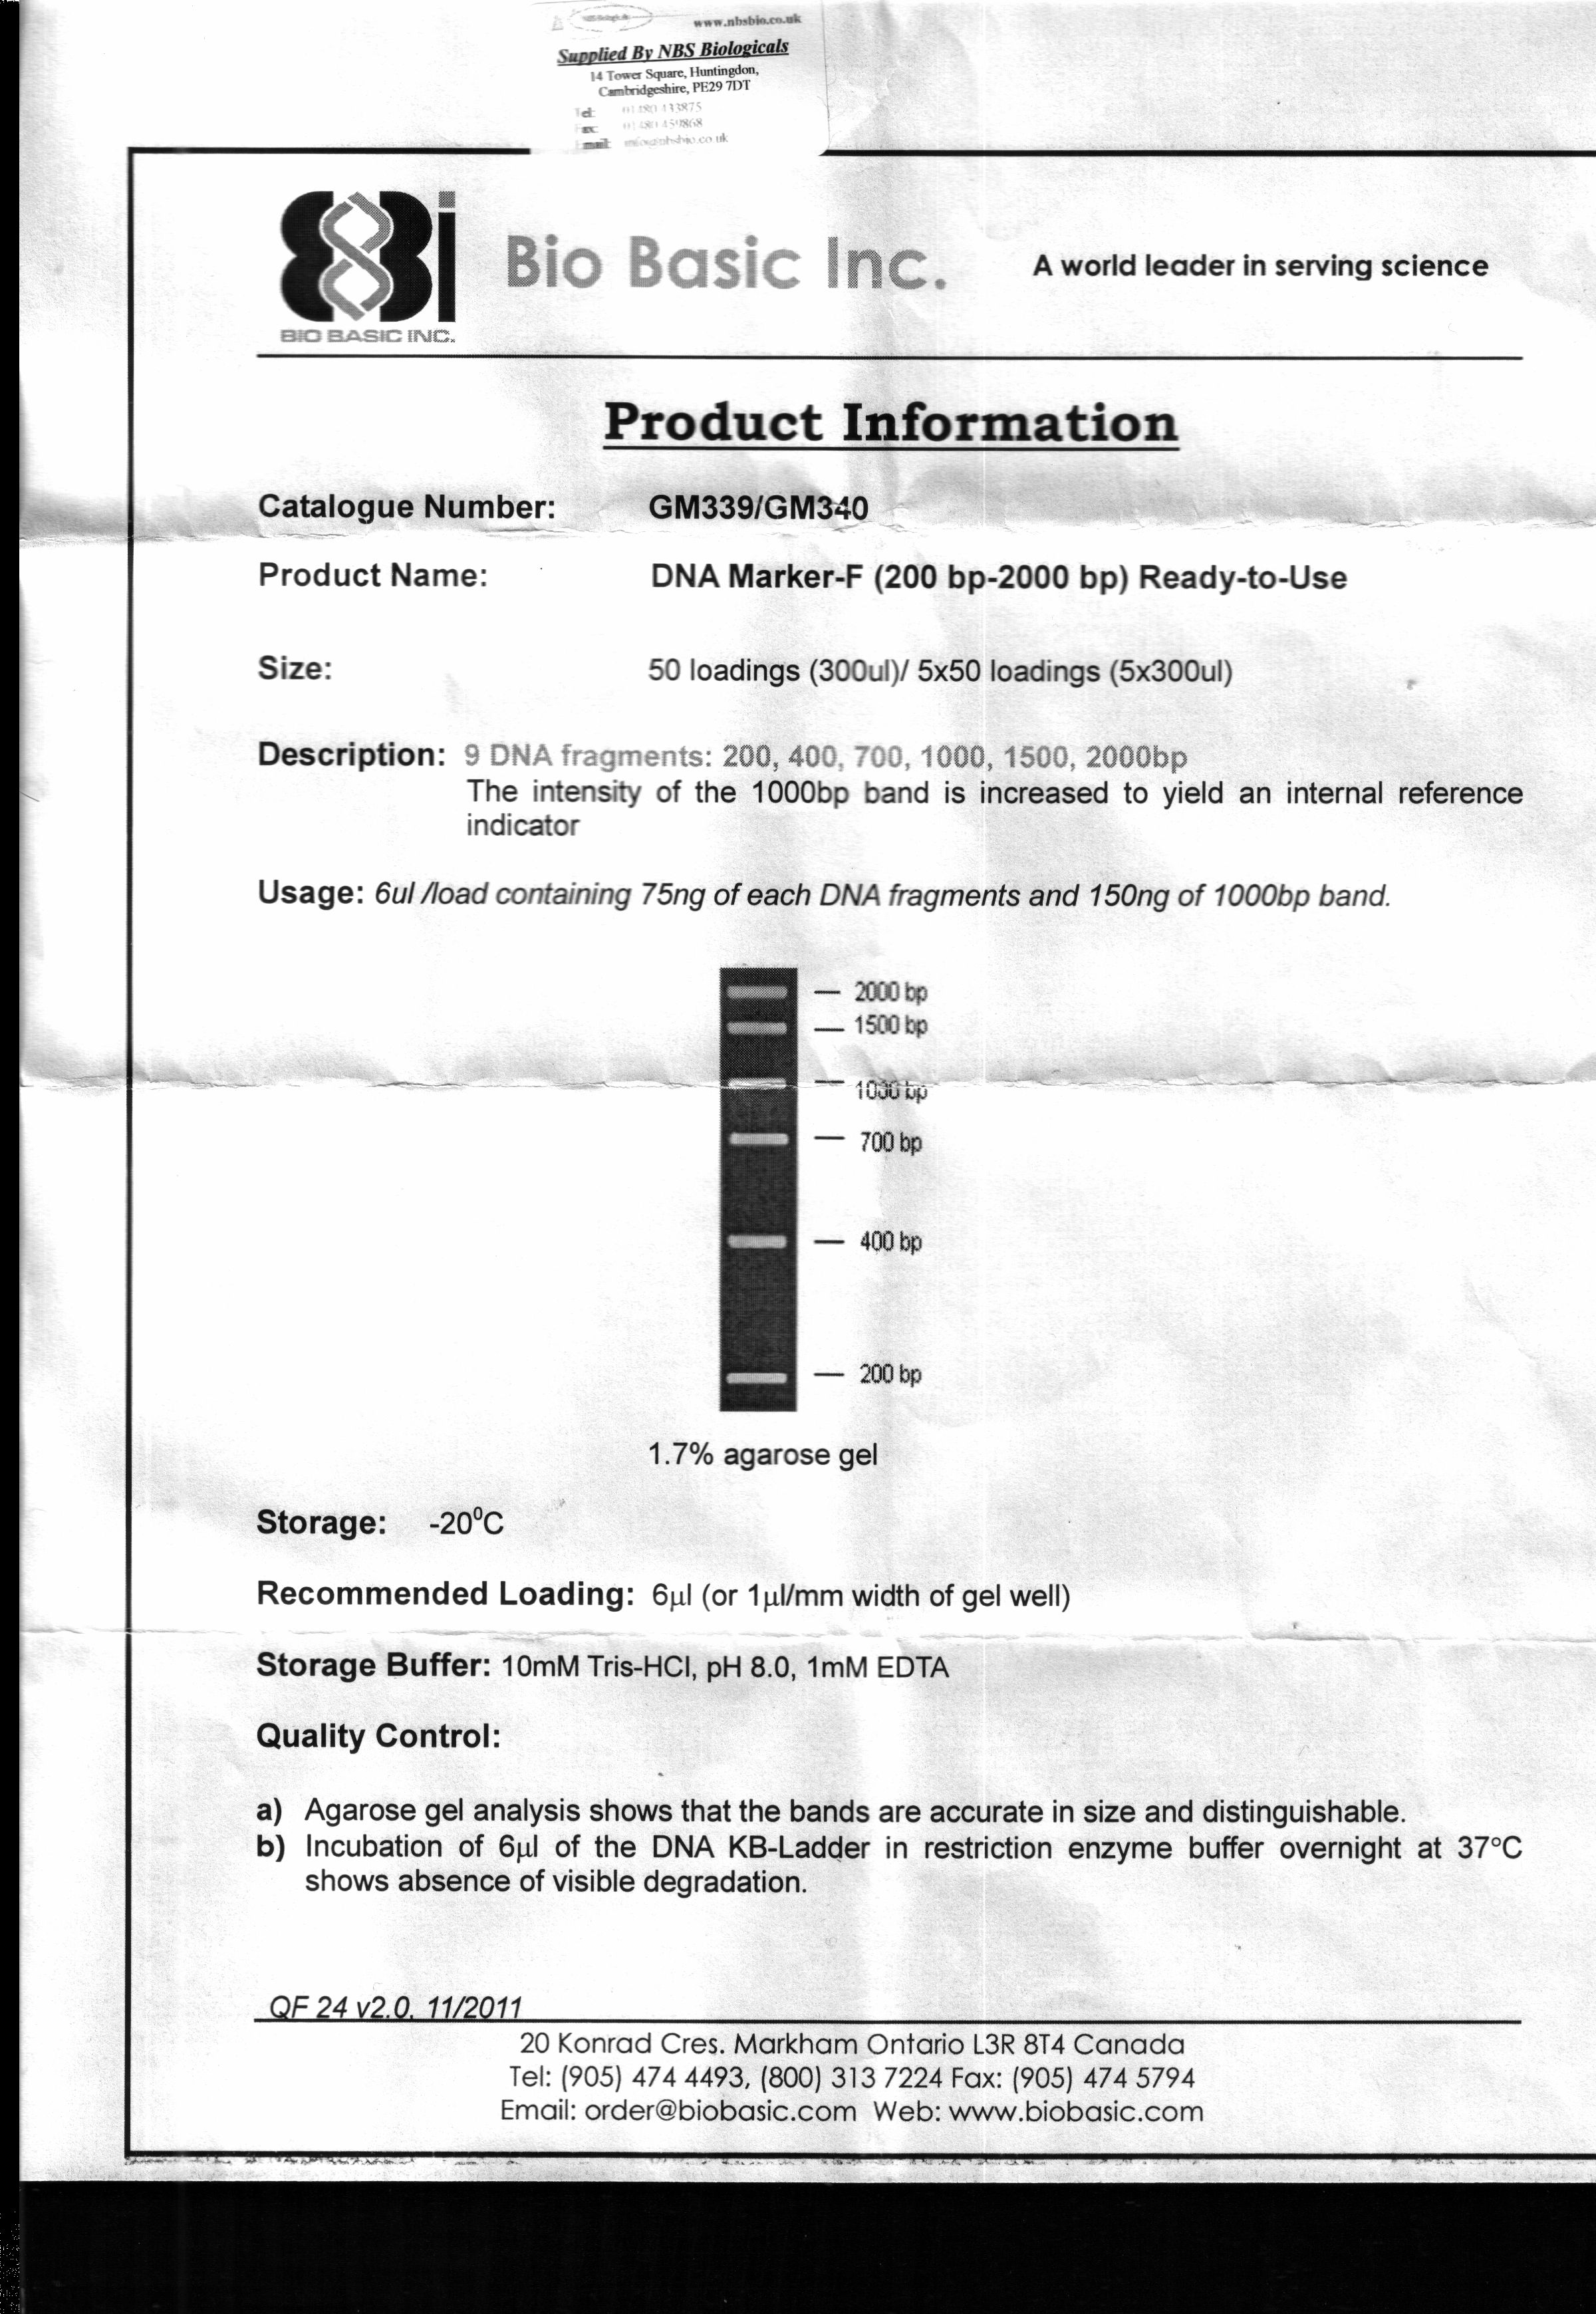
[8] File:Polymerase.pdf Media:DNA_Ladders.jpg Media:New_ladder.jpg
paper more-or-less at random, Eng 1994 where it gives:
PCR Amplification of the Amelogenin Locus The primers used to amplify the X and Y amelogenin sequences were previously described by Nakahori and colleagues [6]. The primer sequences are as follows: primer AMXY-1F (5'-CTGATGGTTGGCCTCAAGCCTGTG-3') primer AMXY-2R (5'-TAAAGAGATTCATTAACTTGACTG-3') PCR was conducted using the Perkin-Elmer GeneAmp | PCR System 9600 Thermal Cycler. Genomic DNA samples were amplified in a 100 txL reaction volume containing 0.2 mM of each dNTP, 50 mM KCI, 10 mM Tris.HC1 pH 8.3, 4.0 mM MgC12, 120 pmoles of each primer, and 2.5 U Taq polymerase. PCR was run for 30 cycles of 94~ for 1 rain (denature), 65~ for 2 min (anneal), and 72~ for 3 min (extend). Following amplification, the PCR products were analyzed by electrophoresis on 1.2% agarose gels run with 1 X TBE (89 mM Tris borate, 89 mM boric acid, 2 mM EDTA) or 6% nondenaturing polyacryl- amide gels run with 1 X TBE. The gels were stained with ethidium bromide and the fragments were visualized by fluorescence under ultraviolet light.
Andy suggests that we go with the instructions on our polymerase for the PCR.
S4438 (with SYBR green)[9]
D6442 (without)[10]
There is a question mark over whether we need a smaller pippette, or perhaps we can let out some solutions to use a larger volume. Katherine Aull was using syringes.
We need tubes for the thermal cycler.
We have SYBR green to replace the ethidium bromide.
Gel electrophoresis
Procedure
Eng has
1.2% agarose gels run with 1 X TBE (89 mM Tris borate, 89 mM boric acid, 2 mM EDTA)
If our dye is SYBR Green I then we need blue light (λmax = 497 nm)
It seems we need to manufacture new electrophoresis equipment or has someone taken it to be repaired? I looked into the possibility of making the gel tray as a single bent piece, but the guys I know said they couldn't do it on 5mm acetate.
We are still looking for a better alternative to the copper electrode that gets eaten by the reagents.
It is common to run reference samples (ladders) alongside the samples, so as to see that weight of the sample. would also be handy to calibrate this process first. ladders can be bought, do we already have?
So, we need TAE or TBE for the buffer.
Tris Safety Data Sheet Boric Acid Safety sheet Example COSHH for PCR and gel electrophoresis with TAE
Stains
SafeView and SafeWhite are from NBS Bio. There are manuals and safety sheets there.
interesting doc about ethidium bromide disposal in th uk here: [11]
What we are looking for
We expect bands at X = 977 bp and Y = 788 bp

on paper
example from cybertory
Is this it? see /results-20120301
"FUCK YES" see /results-20120321


It seems that the lines at X=977bp are in different positions in the male and female lanes in the cybertory example. discuss.
Results
Individuals with deletions such that this test doesn't work on them are extremely rare. So we hope to get correct results for all samples. We discussed blinding the samples to avoid possible bias in interpretation reading the gel, but if we can photograph the gel that could serve that purpose.
It might be nice to do video recording and a write up.
First gel run, Dec 7, 2011
On this date, we had not yet received our PCR tubes, so we were unable to do PCR. Instead, we decided to test our ability to do electrophoresis, using a DNA ladder and SafeWhite stain. We followed the following protocol:
* Agarose, added to buffer, microwaved. 1 gram of agarose to 100ml of tbe: 1% agarose mix will work for 0.4 to 7kb
* cool in a water bath set at 50-55c.
*  add 5 ul of ethidium bromide to gel if using ethidium bromide. If using safewhite add nothing yet
* Add gel to mold: cover sides with masking tape
* Add comb to gel
* Put in fridge for half an hour (or, basically: cool until completely set)
* remove comb.
* Place gel, with tray, in electrophoresis box.
* Fill electrophoresis box with TBE, to cover the gel.
* prepare sample: 5ul of ladder and 2 ul of safewhite (for the 6x solution)
* add sample to gel tray.
* electrophorese at 100v for 1 hour. Negative terminal closest to DNA
* Visualise under UV at 280-300nm.
The reference I used for this protocol: http://www.biocompare.com/protocols/protocol/318/Agarose-Gel-Electrophoresis.html
Unfortunately we were unable to detect any green glow which would indicate that the DNA in the ladder had bound to the Safewhite.
We resolved to make the next test a simple visualisation test: combine ladder with Safewhite and attempt to visualise under UV.
SafeWhite test, Dec 9, 2011
Nicholas combined 2.5ul SafeWhite and 2.5ul DNA Marker-D. He was unable to make this mixture glow under UV.
Second gel run, Dec 13, 2011
Nicholas performed the same protocol as in the "First gel run, Dec 7, 2011", with the following changes:
* SafeWhite was not added.
* Two wells were loaded with 3ul of DNA Marker-D.
* After electrophoresis, the gel was cut in half, with one active well per half.
* One half was submerged in 0.002% methylene blue solution (in 0.1X TBE) for one hour.
* The other half was submerged in 0.001% gentian violet solution (in 0.1X TBE) for half an hour.
* No staining was observed.
3rd or 4th gel run, Jan 25, 2012
We successfully visualised a ladder using the following protocol:
Quantities of chemicals:
- 1% TBE, 1 part "TBE 10x" to 9 parts water
- Agarose, 1 gram per 100ml of TBE
- Ethidium bromide stock solution, 1 gram of powdered EtBr per 100ml of TBE
- 2ul of ethidium bromide stock solution per 40ml of agarose
Protocol:
- 200ml of agarose: 2 grams of agarose powder to 200ml of 1% TBE solution
- Microwaved the agarose, cooled to 50 degrees, added 10ul of ethidium bromide stock solution
- Poured the agarose into a mould, trying to keep the gel as thin as possible. We ended up using about 100ml of agarose. Waited for agarose to cool.
- Added 6ul of a newly-ordered DNA ladder into two wells.
- Electrophoresed, 100 volts for half an hour (thereabouts -- power supply was current limited to 0.8 amps, so voltage dropped to about 80 volts as the electrophoresis progressed)
- Visualised by placing a fluorescent tube with peak emission at 300 nm directly underneath the gel.
1st Feb 2012
our Technical datasheet gives numbers for water to add to rehydrate our primers to 100uM.
8th Feb 2012

Nice picture
not such a good image
after crop and contrast stretch
Everybody's looking for the ladder

after contrast stretch
after desaturate and contrast stretch
hmm...


12th Feb 2012
Mailing list discussion
To think about
- DNA extraction: perhaps try several things, but especially:
- Detergent
- Salt
- DNA extraction: try centrifuging DNA
- DNA extraction: perhaps test by combining some extracted DNA with dilute EtBr solution.
- Primers: can we tell that they are there? Try combining some with EtBr and viewing.
- PCR: Do tests:
- Without primers or template
- Without template
- Without master mix (?)
- PCR: Follow Wikipedia's basic melt, anneal, extend temperatures and times.
Gel run 1
- PCR, no master mix, no template, just primers and 55 ul of buffer (Couldn't do this one, ran out of primers)
- PCR, no master mix, just template and primers and 5ul of buffer (Couldn't do this one, ran out of template and primers)
- PCR, master mix and primers, no template and 30 ul of buffer
- PCR, master mix, primers, and template (from top of tube)
- PCR, master mix, primers, and template (from bottom of tube)
- PCR, master mix (old one), primers, and template (from top of tube)
- PCR, master mix (old one), primers, and template (from bottom of tube)
DNA extraction
- 6ml of saline solution in mouth
- swish for 10 seconds
- spit back into tube
- centrifuge for 5 minutes
- pour off supernatant (liquid on top) into sink.
- suspend tube in boiling water for 10 minutes
- place on ice for 1 minute
- centrifuge for 30 seconds
- transfer 200ul of supernatant to fresh tube. This contains DNA. (Note I didn't do this step -- instead I took liquid from the top of the tube or the bottom of the tube, depending on the lane.)
Protocol
- 10 ul of primer (at a strength of 100 micromoles), x2 (so 10ul for each primer)
- 25 ul of fast-start PCR Taq readymix
- 30 ul of DNA.
- 50 ul of mineral oil on top
PCR
- D = 30 seconds at 98 degress
- A = 40 seconds at 55 degrees (I think)
- E = 60 seconds at 72 degrees
- Repeat 25 times.
- start: 14:22
- end: 16:02
Gel lanes (viewed with the gel oriented so the lanes are at the top)
- Nothing
- master mix and primers, no template and 30 ul of buffer
- master mix, primers, and template (from top of tube)
- master mix, primers, and template (from bottom of tube)
- Ladder, 6ul
- master mix (old one), primers, and template (from top of tube)
- master mix (old one), primers, and template (from bottom of tube)
- Nothing
Started electrophoresis at 16:11 at 100v.
First visualisation taken after ~20 minutes of electrophoresis.
Second visualisation taken after ~45 minutes of electrophoresis.
Results
All these images can be viewed in full resolution, but the thumbnails don't work because MediaWiki sucks.
DNA was extracted following the protocol above: saline solution mouth-wash followed by 10 minutes of immersion in boiling water.

PCR and electrophoresis was performed using the above protocols.

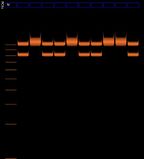
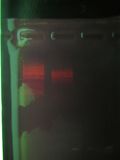
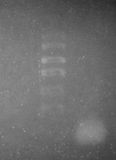
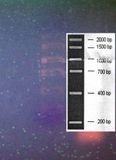
After 20 minutes, bands were observed in lanes 2, 3, 4, 6, and 7. The ladder was also visible in lane 5 but can't be seen in this photo.

After 45 minutes, the bands had become very blurry.

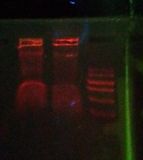
Here is a close-up of the middle portion of the gel. The ladder is faintly visible.

Looking for the ladder and its relation to the bands. On the left is the gel from last Wednesday. The lines in red are clearly lines in the ladder, the orange lines are putative ladder (less certain), and the green lines are the bands. If the interpretation presented here is correct, then this result repeats the results of last Wednesday.

Discussion
- The bands are very blurry and wonky, as if the agar was of varying densities throughout.
- Bands on lanes 3, 4, and 6 travelled less far than bands on lanes 2 and 7. Lane 2 did not include template (i.e. DNA); and I ran out of template in lane 7. So this is an encouraging result.
- The bands are within the bounds of the ladder this time.
- Bands on lanes 3, 4, and 6 are more blurry than bands on lanes 2 and 7. One exciting theory is that bands on those lanes actually worked, and the blurriness is because of the 200 base-pair difference between the two amelogenin sequences; whereas the bands on lanes 2 and 7 contain un-used primer and master mix, which is a) shorter sequences and b) more well-defined (presumably because there is less of a difference between the lengths).
Future
- Try to get the agar more consistent
- Electrophorese for 20 or 30 minutes, but no longer
- Chances are we *haven't* ruined our old master mix, which is great (£)
- We should aliquot our master mixes so we don't have to put them through any more thaw / freeze cycles.
- We may have too much template (surprisingly, this can be a problem)
- Do we need hot start?
Basically I think we are screwing up the PCR stage: using the wrong temperatures, too-short timings, or whatever. Here is a paper on sex typing with amelogenin:
http://library-resources.cqu.edu.au/JFS/PDF/vol_39/iss_6/JFS396941356.pdf
The paragraph relevant to PCR states:
Genomic DNA samples were amplified in a 100 µl reaction volume containing 0.2nM of each dNTP, 50 mM KCl, 10 mM Tris.HCl pH 8.3, 4.0 mM MgCl_2, 120 pmoles of each primer, and 2.5 U Taq polymerase. PCR was run for 30 cycles of 94 C for 1 min (denature), 65 C for 2 min (anneal), and 72 C for 3 min (extend). Following amplification, the PCR products were analyzed by electrophoresis on 1.2% agarose gels run with 1 X TBE (89 mM Tris borate, 89 mM boric acid, 2 mM EDTA) or 6% nonenaturing polyacrylamide gels run with 1 X TBE. The gels were stained with ethidium bromide and the results were visualized by fluorescence under ultraviolet light.
So, we need to:
- Run each PCR stage for longer (2 to 3 times as long)
- Use a higher annealing temperature
15th Feb 2012
Bugs-based course re-alignment
This week Bugs appeared, as mysteriously as he had disappeared previously, and had a look over our work. He pointed out a bunch of things we could look at:
- We should use distilled water.
- We are using too much primer. We were using 100µM concentration, with 10µL in the PCR reaction vessel. Bugs tends to add 3µL of (100 µM conc) primer to 97µL of water, and then use 1 or 2 µL of that in reaction. Too much primer probably shouldn't prevent the reaction from happening, but it could definitely make things messier.
- We were using the wrong concentrations in the reaction. The master mix is designed to work with specific concentrations of primer and template, and if those are messed up the entire thing won't work.
Bugs recommends:
- 25µL master mix
- 2µL F primer
- 2µL R primer
- 10µL DNA
- 11µL water
… for a total volume of 50 µL. We could also halve all these amounts, though that of course will result in less DNA.
Bugs was a bit bewildered by the primers themselves (as we had been, for the same reasons, when we did our first PCR run): the F primer has a melting temperature of between 60 and 72 C (depending on which source you consult), and the R primer has a melting temperature of between 47 and 56 C. Usually primers have melting temperatures within a few C of each other, because the annealing phase is then set to be a couple of degrees below the primer melt temperature. However, one paper (see the last section of results from the 12th) has the annealing temperature set at 65 C. We don't know what the correct option is, so we will just have to try a few.
DNA extraction
I tried two new DNA extraction protocols. The problem with both of these protocols is that we have no idea how much DNA we are actually extracting. Perhaps we are extracting too much. "There is really no lower limit," says Bugs, because PCR will amplify the DNA.
Chelex
- 500ul of chelex solution 5%.
- Cheek scraping using pipette tip. Pipette up and down in chelex solution to mix.
- Incubate for 10 minutes at 56 C.
- Incubate for 6 minutes at 98 C.
- Vortex samples (manually :/)
- Spin tube for 5 minutes in centrifuge.
- Take 50ul supernatant.
Meat tenderiser
- Spit into a PCR tube. Add a few µL of water if necessary (to take it up to a few hundred µL, or about halfway up the PCR tube)
- Cheek scrapings into tube, pipette up and down
- Add a few grains meat tenderiser and mix.
- Leave for a few minutes.
- Add rubbing alcohol and mix.
- DNA precipitates out of solution and appears at the interface of alcohol and saliva.
- Extract the DNA (pipette) into a fresh PCR tube. Leave it to "dry" -- wait for the alcohol to evaporate.
22nd Feb 2012
29th Feb 2012
1st March 2012
7th March 2012
11th March 2012
21st March 2012 : Success!!
22nd March 2012: Anti-success
More results
We've done several more tests since March 22, most of which seem to work. Summaries here The major problem seems to be quality of the extracted DNA: PCR product is frequently quite faint. As of April 26, 2012, DNA extraction technique will be the main focus for the amelogenin test (and for genetic testing of human DNA in general).
Complete protocol as of June 2012
Extraction:
- Fill a PCR tube with 250 ul of 5% Chelex solution.
- Scrape cheek cells using a pipette tip.
- Stir the pipette tip in the Chelex so that the cells are transferred. Perhaps also spit down the pipette tip.
- Incubate at 56 C for 30 minutes. Vortex for a few seconds. Incubate at 94 C for 10 minutes.
- Centrifuge and take supernatant.
PCR:
- Use the primers 5'-CTGATGGTTGGCCTCAAGCCTGTG-3' and 5'-TAAAGAGATTCATTAACTTGACTG-3'
- Use 12.5 ul of Taq master mix, 2 ul of each primer, 3 ul of template, and 5.5 ul of distilled water.
- Initial denat. of 96 C for 5 minutes.
- Then 30 cycles of D = 96 C for one minute, A = 54 C for 30 seconds, E = 72 C for one minute.
Electrophoresis:
- Prepare a 1% agarose gel using 1X TBE and 2ul / 40ml of ethidium bromide.
- Add 1 part loading buffer to 5 parts sample
- Electrophorese at between 80v and 100v for 30 to 60 minutes.
Visualisation:
- Wear glasses and long sleeves.
- Visualise using a 300nm UV light held above the gel. View (or photograph) through an orange filter.
Future Work
Given that we get this working, it should provide a basis for further experiments. As far as I understand it, it is possible to apply this sort of technique, with appropriate primers, to do detection of SNPs [12] opening up the possibility of testing for something common like RHD or MC1R alleles, and perhaps providing a resource for people who want to genetically test themselves for rarer things a la Katherine Aull (but it is much simpler and cheaper to get such tests run commercially, and there is a difficult ethical case to answer about providing genetic testing without proper expert medical support and interpretation of results).
We can also test for nonhuman DNA, i.e. non-genetic diseases caused by viruses or bacteria; test the provenance of various foods (fish in general and sashimi in particular would seem like a good option); or attempt DNA fingerprinting to identify particular people (I haven't looked into this but would guess it involves a few different primers targeting highly-variable portions of the genome).