Silvertail A0 Laser Cutter/Upgrade Notes from HPC to stock Silvertail
< Silvertail A0 Laser Cutter
Jump to navigation
Jump to search
Revision as of 13:31, 27 February 2015 by YetiFiasco (talk | contribs)
This is a quick guide to using the Silvertail A0 Laser Cutter, especially for people who've previously used the previous HPC Laser Cutter.
Please read this carefully.
- This machine is now secured by ACNode - you need to use your Hackspace RFID card to switch on the machine (see additional instructions).
- The Silvertail uses the same LaserCut 5.3 software as the old machine, so the process is pretty much identical. (We've also upgraded to Windows 7 on the laser cutter PC.)
- Please note that as the Silvertail has double the power of our previous laser cutter, the cutting parameters have changed. Please see the new Parameters list.
- The Silvertail is currently quite loud - mostly because of the more powerful extractor fan, which we're planning to move outside. Please be considerate and switch it off when you're not cutting.
- The most important new point to remember: Do not use the Z datum function with your material beneath the cutter head. There is a good chance that it will crush into the head and break the laser cutter.
Cutting Process
- Place your workpiece in a convenient place on the bed (near the bottom-right is easiest).
- Move the cutting head to the top-right corner of where you want to cut by hitting Esc twice on the laser cutter keypad, and then using the arrow keys (you can hold them down to move faster).
- Focus the machine:
- Switch into Z-mode by pressing Z on the keypad.
- Make sure the cutting head is positioned over your work - if necessary, lower the Z-height by pressing the down arrow on the keypad.
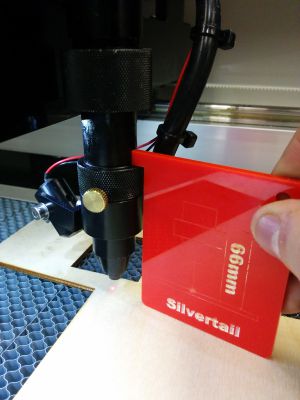
- Using the alignment tool, raise or lower the Z height using the keypad until the head is positioned at the correct height, as shown in the image to the right.
- Take care not to move the cutting bed or your work into the laser head - the machine will not stop this.
- Press Z again to exit Z-mode.
- Import your work into LaserCut. Don't use the "Set laser origin" function - the origin (blue dot in LaserCut) corresponds to where you moved the cutting head.
- Cut as you usually would. (But use "run box" first!)
