Equipment/Mop: Difference between revisions
(Added mop rules.) |
(Mop specifications) |
||
| Line 8: | Line 8: | ||
Well, if you read on, you'll find out exactly what the fuss is about and I think you'll be quite pleased with what you read. I might be wrong, but I don't think so. Most people I've asked have been pretty chuffed so... hey ho. | Well, if you read on, you'll find out exactly what the fuss is about and I think you'll be quite pleased with what you read. I might be wrong, but I don't think so. Most people I've asked have been pretty chuffed so... hey ho. | ||
==Specification== | |||
===Handle=== | |||
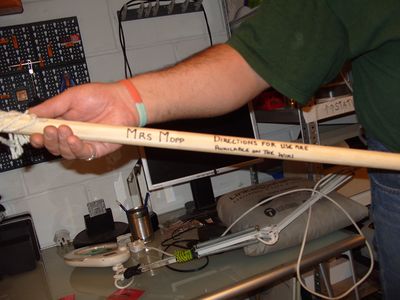
The handle contains some text and a QR code. | |||
{|border="1" cellpadding="5" cellspacing="0" | |||
|- | |||
| '''Length (mm)''' | |||
| 1216 | |||
|- | |||
| '''Diameter (mm)''' | |||
| 25 | |||
|- | |||
| '''Material''' | |||
| [http://en.wikipedia.org/wiki/Pinus_strobus Pinus strobus] (Eastern White Pine) | |||
|- | |||
| '''Dome-end radius (mm)''' | |||
| 14 | |||
|} | |||
===Ferrule=== | |||
The ferrule is printed with patent number EP0383552. This patent is described as follows: | |||
<blockquote>''An attachment device for connecting a mop head to a pole comprising a collar and a boss extending upwardly from the collar. A plurality of slots extend vertically through the boss wall, the slots being bridged by bridging nuts. This arrangement allows the diameter of the channel defined by the boss to be resiliently increased in order to accomodate poles of differing diameters within the channel.''</blockquote> | |||
{|border="1" cellpadding="5" cellspacing="0" | |||
|- | |||
| '''Length (mm)''' | |||
| 75 | |||
|- | |||
| '''Colour''' | |||
| Green | |||
|- | |||
| '''Material''' | |||
| Injection-moulded Polyethaline | |||
|- | |||
| '''Dome-end radius (mm)''' | |||
| 14 | |||
|} | |||
===Head=== | |||
The head is the business end of the mop. You don't want to mess with this end. | |||
{|border="1" cellpadding="5" cellspacing="0" | |||
|- | |||
| '''Average Length (from ferrule) (mm)''' | |||
| 116 | |||
|- | |||
| '''Colour''' | |||
| Cream | |||
|- | |||
| '''Material''' | |||
| Natural unbleached cotton | |||
|- | |||
| '''Number''' | |||
| ''Counting in process'' | |||
|} | |||
==Mop placement== | ==Mop placement== | ||
Revision as of 04:38, 9 October 2011
Introduction
Hi guys and girls, thanks for coming.
You've logged on here to read about how to use the "Mrs Mop" mop. You might well have read this message on the side of the mop and thought to yourself "I suppose I should log onto the old wiki and see what all this fuss is about!".
Well, if you read on, you'll find out exactly what the fuss is about and I think you'll be quite pleased with what you read. I might be wrong, but I don't think so. Most people I've asked have been pretty chuffed so... hey ho.
Specification
Handle
The handle contains some text and a QR code.
| Length (mm) | 1216 |
| Diameter (mm) | 25 |
| Material | Pinus strobus (Eastern White Pine) |
| Dome-end radius (mm) | 14 |
Ferrule
The ferrule is printed with patent number EP0383552. This patent is described as follows:
An attachment device for connecting a mop head to a pole comprising a collar and a boss extending upwardly from the collar. A plurality of slots extend vertically through the boss wall, the slots being bridged by bridging nuts. This arrangement allows the diameter of the channel defined by the boss to be resiliently increased in order to accomodate poles of differing diameters within the channel.
| Length (mm) | 75 |
| Colour | Green |
| Material | Injection-moulded Polyethaline |
| Dome-end radius (mm) | 14 |
Head
The head is the business end of the mop. You don't want to mess with this end.
| Average Length (from ferrule) (mm) | 116 |
| Colour | Cream |
| Material | Natural unbleached cotton |
| Number | Counting in process |
Mop placement
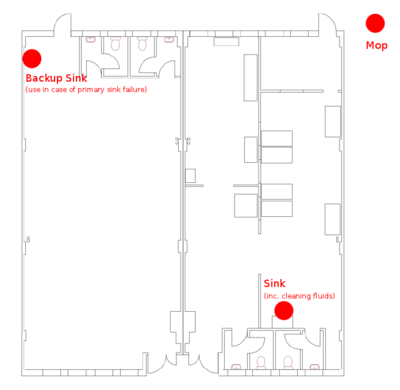
Ford had it wrong. A real hoopy frood always knows where his mop is. A sympathetic infographic nerd helped us put together a couple of visual aids for mop location and placement.
Mop map: Map with mop mark. Most moppers make merry not missing the mop.
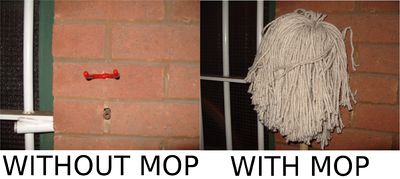
This is so you can see what the hook looks like with the mop and without it. In case you were wondering, we put it outside so if the mop is a bit whiffy, it doesn't disturb the otherwise beautifully-scented hackspace working area. It might bother the smokers, but its not as if they care about foul smells.
Mop usage: a guide
First off thanks for coming. It's important that we keep the hackspace tidy so that we can all have a good time. Now, onto mop usage. I'm going to lay out the usage information in numerical steps. The idea here is to start at the lowest number (usually 1), perform the action specified following the number and then advance to the next number. If there is no next number, you've finished mopping and should treat yourself to something from the fridge (providing you have paid the necessary fee into the correctly labelled segment of the box). If you have ever been incarcerated at her Majesty's pleasure you will be familiar with this procedure but please read this anyway as there may be important health and safety considerations specific to the London Hackspace.
This next bit is the numbered list I spoke about in the last paragraph.
- Sweep the floor (Bilko's top tip)
It's very important that you first sweep the floor before mopping. The reason for this is simple; I'll give you some time to think about it for yourself. If you can't think of it, read ahead. If you do think of it, make sure you read ahead to ensure that you thought of the right thing.......................... Had a good little ponder there? Good! We sweep the floor to make sure that we don't end up adhering dust and other such dirty specks to the floor with the water that we're going to splash on later (apologies for the spoilers). - Find a bucket for the mop.
We would've got one but Bilko went out to buy the mop and the bucket was £12.50! Who's going to pay £12.50 for a bloody mop bucket. Some people suggest you use a box from the dirty room. To be honest, my personal opinion is just go with your gut - you probably won't do too bad. - Fill that bucket with water
You're going to want to get some H2O up in here! Please make sure you don't confuse any other colourless liquids you find around the Hackspace with water (e.g. hydrochloric acid or deuterium). Stick some of this awesome liquid in the bucket, and why not chuck in a bit of soap. Ensure that your soap is friendly to the surface you're cleaning and make sure the final solution (nothing to do with homicide; different usage of the word 'solution') is fairly mild in strength. - Get Mrs Mop nice and wet
Dip her luscious white locks in your soapy concoction and make sure she's soaked up as much as she can. - Slap the mop on the floor
You're going to get the floor wet now. I know you probably think that getting the floor wet is a bad thing, but in the name of cleanliness almost anything goes. Spread the water around so it soaks up all the unsweepable dirt. That's basically the crux of this whole mopping ordeal: we're going to make this water dirty and then remove the water, leaving the floor cleaner. Once you've spread the water around, feel free to rub it into the ground a bit to make sure it really soaks up the dirt. - Soak up the water
Dry the mop head. If we'd spent the £12.50 on the bucket, we'd have a cool drying section that you press the mop into. But £12.50 is £12.50 and let's just not go there. Maybe start a pledge or something and we can raise the dough. It's an unnecessary luxury though. You'll need to grab it with your hands and wring it dry for the moment (marigolds are optional... BUT RECOMMENDED ;-)). Once it's dry, fly the mop head around the wet patches until either the floor is completely dry or the mop is completely full. If the former, move onto the next step. If the latter, repeat this step. - Is the floor completely clean?
If so, move on to the next step. If not, choose a new area of dirty floor, empty out your dirty water and go back to step 2. Don't worry champ, you'll get there in the end. - Debrief
Right. You've done it. That was the hard part and now you're pretty much a hero. Let's end it well and we can go and grab a beer. Firstly, bring the mop over to a tap and wash it clean. Dry it with the wringing method I mentioned before and once it's completely dry we can go and hang it up. Put it back where you found it. You know where - that hook outside. Yeah, don't just leave it on the floor. You've done so well with all the tidying, it would be a pity to be so careless right at the end.
- Do not use the mop if you haven't been trained. Read the instructions above, but if you're unsure you should err on the side of caution. The mop is serious business.
- Mrs Mop must remain in the space. Please subdue the temptation to whisk her away to Paris: while she'd certainly appreciate it, she isn't a one cleaner mop. This mop needs to feel the sensitive touch of many!
- Having said that, please keep your relationship with the mop platonic and respectful. Mop-fanciers (and we've all dabbled) please do not cross the line.
Conclusion
Thank you for consulting the mop page. Your journey here is done... for now.


