Project:25-hpamakers-reprap: Difference between revisions
Samthetechie (talk | contribs) m (→1-Construction) |
mNo edit summary |
||
| (11 intermediate revisions by 2 users not shown) | |||
| Line 9: | Line 9: | ||
=====PLA Parts Needed (as of 17:18 On Wed 11th May 2011)===== | =====PLA Parts Needed (as of 17:18 On Wed 11th May 2011)===== | ||
1 x [https://github.com/prusajr/PrusaMendel/blob/master/stl/endstop-holder.stl Endstop Holder] | |||
2 x [https://github.com/prusajr/PrusaMendel/blob/master/stl/pulley.stl Pulley] | 2 x [https://github.com/prusajr/PrusaMendel/blob/master/stl/pulley.stl Pulley] | ||
4 x [https://github.com/prusajr/PrusaMendel/blob/master/stl/pla-bushing.stl PLA Bushings] | |||
[https://github.com/prusajr/PrusaMendel/tree/master/stl Parent folder for the Prusa STL Files] | [https://github.com/prusajr/PrusaMendel/tree/master/stl Parent folder for the Prusa STL Files] | ||
====2-Firmware==== | =====Parts Printed===== | ||
4 x PLA Bushings printed at 19:07 on Wed 11th May 2011 by Kal | |||
1.5 x Endstop holder printed at 19:07 on Wed 11th May 2011 by Kal | |||
1 x Endstop holder printed on Fri 13th may 2011 by Glen | |||
====2-Electronics==== | |||
(Sam) Makerbot to Reprap PCB Adaptations. | |||
====3-Firmware==== | |||
(Sam)RepRap Motherboard v1.2 firmware installation. | (Sam)RepRap Motherboard v1.2 firmware installation. | ||
Notes: | Notes: | ||
==== | ====4-Testing==== | ||
(Sam) Check Wiring + Firmware: Desktop-based test of all stepper motors and electronics. | (Sam) Check Wiring + Firmware: Desktop-based test of all stepper motors and electronics. | ||
Notes: I am going to be flashing the firmware using an FTDI cable and then I will check our USB to serial cable. | Notes: I am going to be flashing the firmware using an FTDI cable and then I will check our USB to serial cable. | ||
| Line 32: | Line 39: | ||
We might need to cut some more steel stock if any of the lengths are too short. | We might need to cut some more steel stock if any of the lengths are too short. | ||
==== | ====5-Commissioning==== | ||
Begin printing | Begin printing | ||
Make first model | Make first model | ||
| Line 41: | Line 48: | ||
[[User:samthetechie|samthetechie]] | [[User:samthetechie|samthetechie]] | ||
[[User: | [[User:lambda25|Kal]] | ||
[[User:alias|alias]] | [[User:alias|alias]] | ||
| Line 110: | Line 117: | ||
==Electronics== | ==Electronics== | ||
We are using gen3 MakerBot Electronics which have been adapted for use with Reprap using this [http://reprap.org/wiki/PCB_adaptions_for_Mendel guide] | |||
===USB to TTL Adapter=== | ===USB to TTL Adapter=== | ||
| Line 141: | Line 149: | ||
===Motherboard=== | ===Motherboard=== | ||
Reprap Motherboard v1.2 | |||
===Stepper | ===Stepper Motors + Driver Circuits=== | ||
3 x Stepper Motor Driver v2.3 r1 boards | |||
5 x [http://store.makerbot.com/nema-17-stepper-motor.html Nema 17 Stepper Motors] | |||
==Where?== | ==Where?== | ||
| Line 155: | Line 167: | ||
==Why?== | ==Why?== | ||
Because we want a 3D printer! | Because we want a 3D printer! | ||
[[Category:Projects]] | |||
Latest revision as of 23:56, 28 May 2013
Aim
Finish construction of the printer ASAP and get it running reliably!
How?
Current Development Milestones
1-Construction
PLA Parts Needed (as of 17:18 On Wed 11th May 2011)
1 x Endstop Holder
2 x Pulley
4 x PLA Bushings
Parent folder for the Prusa STL Files
Parts Printed
4 x PLA Bushings printed at 19:07 on Wed 11th May 2011 by Kal 1.5 x Endstop holder printed at 19:07 on Wed 11th May 2011 by Kal 1 x Endstop holder printed on Fri 13th may 2011 by Glen
2-Electronics
(Sam) Makerbot to Reprap PCB Adaptations.
3-Firmware
(Sam)RepRap Motherboard v1.2 firmware installation.
Notes:
4-Testing
(Sam) Check Wiring + Firmware: Desktop-based test of all stepper motors and electronics.
Notes: I am going to be flashing the firmware using an FTDI cable and then I will check our USB to serial cable.
(Kal) Check Mechanical Construction against instructions + Begin Calibrating
Notes: Hey Kal, Sam here, in order to mechanically calibrate the frame I would recommend going through part 5 (page 32) of this visual guide:
http://garyhodgson.com/reprap/prusa-mendel-visual-instructions/
We might need to cut some more steel stock if any of the lengths are too short.
5-Commissioning
Begin printing Make first model Make first part Make first set of parts
Who?
What?
3D Printer
Sam: I am constructing the printer using this really great guide: Prusa Visual Instructions
Mendel Specifications
The table below outlines the specifications of the machine.
| Metric | |
|---|---|
| Model | Reprap II: Mendel "Mendel" |
| Technology | FFF (Fused Filament Fabrication)/Thermoplastic extrusion |
| Price of all materials | €350 |
| Annual Service Cost | Occasional oiling = €5. It can print its own replacement printed parts at material cost. |
| Size | 500 mm (W) x 400 mm (D) x 360 mm (H) |
| Weight | 7.0 kg. |
| Build Envelope | 200 mm (W) x 200 mm (D) x 140 mm (H). |
| Materials | PLA, HDPE, ABS & more. Uses ø 3 mm filament. |
| Material Cost | PLA: €22/kg, HDPE: €11/kg, ABS: €17/kg. |
| Speed | 15.0 cm3 per hour solid (test done for PLA, similar for others). |
| Accuracy | Diameter of nozzle 0.5 mm, 2 mm min. feature size, 0.1 mm positioning accuracy, layer thickness 0.3 mm |
| Finish | Fair |
| Volume of printed parts to replicate | 1110 cm3 |
(With the standard infill settings the 15.0 cm3 per hour solid extrusion rate is equivalent to a built volume rate of 19.0 cm3 per hour.)
Consumables
Blue Decorator's Tape
PLA, HDPE, ABS Filament
Computing
Netbook with Solidworks and Reprap Host Software.
Power
Converted 300W ATX Power Supply. +12V and GND. 5A current.
Electronics
We are using gen3 MakerBot Electronics which have been adapted for use with Reprap using this guide
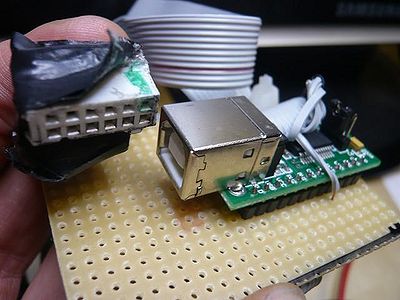
USB to TTL Adapter
Based on the FTDI FT232R.
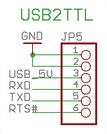
Currently the connector is wired such:
GND DCD# VCC TXD RXD RTS#
While the Sanguino (at least v1.0) expects:
GND GND [USB_5V (VCC)] RXD TXD RTS#
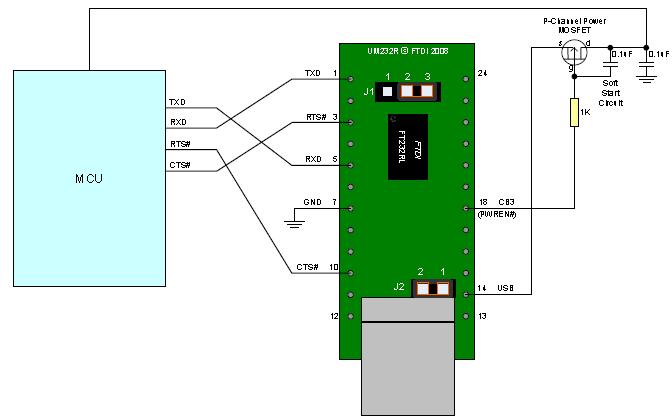
From the datasheet:
It can be inferred that the correct terminals on the cable in Fig. 1 should be:
GND GND VCC TXD RXD CTS#
All said, the extruder and main motherboard (gen 3 reprap electronics) have been successfully flashed using this controller so perhaps the critical lines are in, one GND, VCC and TXD plus RXD which afaik handle the data transmission.
Motherboard
Reprap Motherboard v1.2
Stepper Motors + Driver Circuits
3 x Stepper Motor Driver v2.3 r1 boards
Where?
Why?
Google Docs
Where?
London Hackspace: http://london.hackspace.org.uk/
Why?
Because we want a 3D printer!


