Propane Torch (Sievert): Difference between revisions
(Image Added) |
mNo edit summary |
||
| Line 16: | Line 16: | ||
Instructions for use: | Instructions for use: | ||
1) Switch on the gas supply at the bottle | 1) Switch on the gas supply at the bottle | ||
2) Have a lighter to hand. One can usually be found in the metal casting supplies box under the kilns | 2) Have a lighter to hand. One can usually be found in the metal casting supplies box under the kilns | ||
3) Open the gas valve on the torch lightly. The torch lights best with a small supply of gas | 3) Open the gas valve on the torch lightly. The torch lights best with a small supply of gas | ||
4) Carefully move the lighter into the path of the torch and ignite | 4) Carefully move the lighter into the path of the torch and ignite | ||
5) Adjust the valve on the torch to optimise the gas flow for a steady flame, appropriate in size to the part you are working on | 5) Adjust the valve on the torch to optimise the gas flow for a steady flame, appropriate in size to the part you are working on | ||
6) When finished, switch of the gas AT BOTH THE TORCH AND GAS BOTTLE | 6) When finished, switch of the gas AT BOTH THE TORCH AND GAS BOTTLE | ||
7) Coil the torch up neatly on top of the gas bottle and place it to one side in the cage | 7) Coil the torch up neatly on top of the gas bottle and place it to one side in the cage | ||
Revision as of 07:21, 6 April 2022
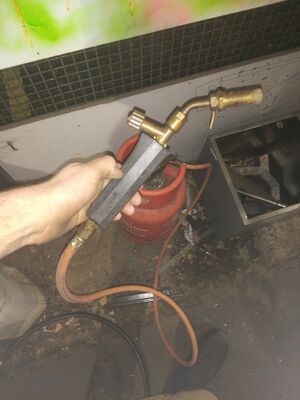
A light-duty torch intended primarily for soldering or light brazing, but it can also be used for other heating tasks such as heat-treating or hot bending. For heating larger parts the heavy-duty Flamefast torch might be a better match.
This torch is kept in the cage and is usually to be found connected to the small gas bottle in there.
Instructions for use:
1) Switch on the gas supply at the bottle
2) Have a lighter to hand. One can usually be found in the metal casting supplies box under the kilns
3) Open the gas valve on the torch lightly. The torch lights best with a small supply of gas
4) Carefully move the lighter into the path of the torch and ignite
5) Adjust the valve on the torch to optimise the gas flow for a steady flame, appropriate in size to the part you are working on
6) When finished, switch of the gas AT BOTH THE TORCH AND GAS BOTTLE
7) Coil the torch up neatly on top of the gas bottle and place it to one side in the cage
