Equipment/HP 8112A Programmable Pulse Generator: Difference between revisions
No edit summary |
mNo edit summary |
||
| (2 intermediate revisions by the same user not shown) | |||
| Line 1: | Line 1: | ||
{{EquipmentInfobox | |||
| name = HP 112A Programmable Pulse Generator <!-- Name of the item. --> | |||
| image = HP8112A.jpg <!-- Image of the item. Leave with placeholder image if none exists. --> | |||
| model = Unknown <!-- Model --> | |||
| category = Equipment <!-- Main category. Please leave alone to keep item in this category --> | |||
| subcat = Test equipment<!-- Sub-category if one exists. Please check main listing to see other categories contained within the main one --> | |||
| status = <!-- Set to one of; Good working order, Faulty, Out of order, Under construction, Out of consumables, Scrapped, or Unknown --> | |||
| consumables = Unknown <!-- Any items used up in normal operation, such as; ink, paper, saw-blades, cutting disks, oil, etc.. --> | |||
| accessories = Unknown <!-- Any items associated with the equipment but not consumable, such as; drill bits, safety gloves, goggles, etc.. --> | |||
| reqtraining = <!-- Is training required to use this equipment? Yes or no. --> | |||
| trainlink = Unknown <!-- If training is required, provide a link to training signup or contact page. Otherwise leave blank. --> | |||
| acnode = <!-- Is the equipment ACnode locked? --> | |||
| owner = Unknown <!-- Provide a link to owners members page if other than LHS --> | |||
| origin = Unknown <!-- If via pledge, please link to the completed pledge page on the wiki --> | |||
| location = <!-- Floor, room/zone and location within that area --> | |||
| maintainers = <!-- NO LINKS PLEASE; it currently breaks the template. If someone is nominated as managing the upkeep of this item, please list them here. --> | |||
| template_ver = 1.1 <!-- Please do not change. Used for tracking out-of-date templates --> | |||
}} | |||
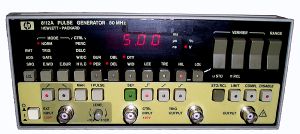
HP 112A Programmable Pulse Generator with GPIB remote control. | HP 112A Programmable Pulse Generator with GPIB remote control. | ||
The HP 8112A is a fully programmable 50 MHz pulse generator with 5 ns transitions and 32 Vpp into open circuit) max output amplitude. All pulse parameters are variable including delay and double pulse spacing. | The HP 8112A is a fully programmable 50 MHz pulse generator with 5 ns transitions and 32 Vpp into open circuit) max output amplitude. All pulse parameters are variable including delay and double pulse spacing. | ||
Latest revision as of 16:56, 29 May 2013
| HP 112A Programmable Pulse Generator | |
|---|---|
 | |
| Model | Unknown |
| Sub-category | Test equipment |
| Consumables | Unknown |
| Accessories | Unknown |
| Training link | Unknown |
| Owner | Unknown |
| Origin | Unknown |
HP 112A Programmable Pulse Generator with GPIB remote control.
The HP 8112A is a fully programmable 50 MHz pulse generator with 5 ns transitions and 32 Vpp into open circuit) max output amplitude. All pulse parameters are variable including delay and double pulse spacing.
Besides the comprehensive trigger modes, external modulation capabilities extend applicability. 3-level signals and upper level, width, period and delay-modulated signals are available. These can be combined with the trigger modes so that complex real-life signals like modulated bursts are simulated easily.
Step response and trigger hysteresis measurements require fast transitions or sawtooth signals as obtained in the HP 8112A's linear transition mode - either fixed 5 ns or variable from 6.5 ns. The new cosine transitions, also variable from 6.5 ns, mean that band-filtered signals are now just as simple to obtain.
Sensitive devices are protected by programming output limits and the upper limit can be controlled by the device supply. Also, constant energy or constant width can be programmed.
Use
- Power device on
- Press the green button to get it into a sane mode
- It will now do 200mS pulses.
- Press 'HIL' and use the vernier/range buttons to set the upper voltage you want (e.g. 1.2 volt)
- Press the 'LOL' button and set the lower voltage (e.g. 0volt)
- Press the disable button
- You now have a 1.2Volt pulse on the output (stick an LED into it to check).
- Pres the DURation button to change the duration; or press it again to get the duty cycle PERcentage.
For the rest - see the manual.
A useful trick for arduino folks - the E.BUR mode can do a count - e.g. on pressing the 'man' button it will fire N (1 to 999) pulses; or just one. Which is very useful for I/O testing.
- Info: http://www.home.agilent.com/agilent/product.jspx?nid=-536895213.536881157.00&lc=eng&ckey=1000001733%3aepsg%3apro&id=1000001733%3aepsg%3apro&cc=GB&cc=GB&lc=eng
- Manual: http://www.home.agilent.com/agilent/redirector.jspx?action=ref&cname=AGILENT_EDITORIAL&ckey=614814&lc=eng&cc=GB&nfr=-536902328.536881157.00
- Service Manual: http://cp.literature.agilent.com/litweb/pdf/08112-90004.pdf
GBIP
See the service manual for GPIB control - they basically mimic the buttons on the front.
Calibration
Please discuss any calibrations you want to do with dirkx(a)apache(dot)org first - he's done frequency and the slope forms (8/2011).