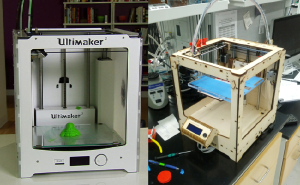
Ultimakers-Induction: Difference between revisions
mNo edit summary |
mNo edit summary |
||
| (29 intermediate revisions by 2 users not shown) | |||
| Line 1: | Line 1: | ||
[[File:Ultimakers.png|thumbnail]] | |||
==Ultimaker-2 training guide== | ==Ultimaker-2 training guide== | ||
This guide covers the | This guide covers the skill and knowledge prerequisites for the use of the Ultimaker 3d printers at the hackspace. The Ultimakers are very nice 3d printers and we would like them to stay that way. Please read through this doc, and be sure to bring a preprepared gcode file with you when attending the Ultimaker induction which we will print at the session. | ||
The Ultimakers are | The Ultimakers are provided by [https://www.wevolver.com/ wevolver], and are being used for their [https://www.wevolver.com/wevolver.staff/robots-for-good/main/description/ Robots for good] project. Therefore they will have priority on usage of the machines. So please be prepared to be flexible in usage. If you absolutely need something printing, then consider using a commercial 3d-printing service. | ||
There is some additional documentation linked to from the wiki page; | The intention is that members using the Ultimakers will already have some experience with 3d-printing, and would be familiar with concepts such as CAD modelling, STL files, gcode files, and slicing models for 3d printing. If you are not familiar with these terms, I would suggest that you start by watching some of the excellent tutorial videos available, and then do the induction/training on the hackspace's Lulzbot 3d printer. | ||
The Ultimakers are setup nicely for PLA, and the manufacturer recommends PLA for beginners. Therefore 3mm PLA is the only filament material that should be used in the Ultimakers at this time. This is important as switching between filament material types complicates maintaining the printers and is a common source of nozzle blockage. | |||
If you have any questions about materials, please email the maintainers from the link here [[Equipment/Ultimakers]]. | |||
=== Costs === | |||
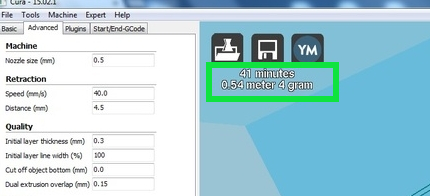
The fee to cover running costs of the Ultimakers is based on filament used. The charge is currently 50p/metre of filament. Cura estimates the amount of filament that will be used here; | |||
[[File:Rook-cura-screenshot1.jpg|location=left]] | |||
You can configure Cura to tell you how much the print will cost by setting the filament cost in the preferences; | |||
<gallery> | |||
Screenshot_-_101115_-_03-40-32.png | |||
Screenshot_-_101115_-_03-34-39.png | |||
Screenshot_-_101115_-_03-41-30.png | |||
</gallery> | |||
Please pay by leaving the money in the tin. | |||
=== Reference Docs === | |||
There is some additional documentation linked to from the wiki page relating to the equipment; | |||
https://wiki.london.hackspace.org.uk/view/Equipment/Ultimakers | https://wiki.london.hackspace.org.uk/view/Equipment/Ultimakers | ||
==Getting Started== | ==Getting Started== | ||
=== | ===Download Cura for your platform, and install=== | ||
https://ultimaker.com/en/products/cura-software | |||
You will need to prepare and slice your CAD model using Cura. There is no PC attached to the Ultimakers, so do this beforehand. | |||
===Bring something to print, sliced with Cura=== | |||
Please design or download some small 3d print model, and prepare a gcode file that Cura says will take less than 20 minutes to print. There are loads of examples on Thingiverse, you might have to scale it down in order to print in 20 mins or less. | |||
===3mm PLA filament, and an sdcard=== | ===3mm PLA filament, and an sdcard=== | ||
| Line 18: | Line 51: | ||
There is currently filament available, (Blue PLA 3mm) and it’s available for use, and the cost will be 50p per metre used. However if it’s used up, you will need to provide your own. | There is currently filament available, (Blue PLA 3mm) and it’s available for use, and the cost will be 50p per metre used. However if it’s used up, you will need to provide your own. | ||
Our Ultimaker configuration requires that gcode be provided on an sdcard. There is one in the machine at present, but I would suggest bringing your own in case it’s not there. | Our Ultimaker configuration requires that gcode be provided on an sdcard. There is one sdard in the machine at present, but I would suggest bringing your own in case it’s not there. | ||
===Download the Ultimaker-2 user manual=== | ===Download the Ultimaker-2 user manual=== | ||
| Line 73: | Line 103: | ||
==Maintenance== | ==Maintenance== | ||
===Startup checks=== | |||
# check that filament is extruding cleanly. It should be free flowing like in this video, and not balling up on the nozzle tip; | |||
{{#ev:youtube|b63cq_Oe5rY}} | |||
# check the first layer height and adhesion. It should be pretty much perfect. | |||
===Shutting Down=== | |||
Please leave the Robotics area tidy, and replace the dust cover on the Ultimaker before you departs. | |||
Thanks! | |||
===Changing Filament=== | ===Changing Filament=== | ||
| Line 80: | Line 126: | ||
====Unload Filament==== | ====Unload Filament==== | ||
# To unload filament, turn the front dial to Material, and then turn to Change. | |||
# The extruder will heat up, and the UM2 will start to retract the filament | |||
# the filament can be removed once it is clear of the feeder wheel | |||
# Visually inspect the tube and the feeder mechanisms, and the extruder to ensure that all remaining filament is clear. | |||
# use tweezers to remove and remaining filament strands | |||
# Press Ready, to finish this process. The extruder will stop retracting. | |||
< | <gallery> | ||
22330677262 ff846c9111 z.jpg | |||
22330680752 ed37f58e55 z.jpg | |||
22317674416_8dd15db350_z.jpg | |||
</gallery> | |||
====Load Filament==== | ====Load Filament==== | ||
| Line 93: | Line 143: | ||
1) Use a pair of snips to cut a point into the end of the filament, to help it slide into the Feeder tube; | 1) Use a pair of snips to cut a point into the end of the filament, to help it slide into the Feeder tube; | ||
< | <gallery> | ||
21720488644 c7215f2634 z.jpg | |||
22155524808_cb6c9ce0ca_z.jpg | |||
</gallery> | |||
2) To load filament, select change | 2) To load filament, select material, and then select change, select ready, and it will begin to slowly pull filament into the feeder | ||
3) once the filament is clear, and into the tube, press ready on the UM2 dial panel, and it will rapidly feed the filament to the extruder | |||
<gallery> | |||
22156447909_2c2d244a7f_z.jpg | |||
</gallery> | |||
4) confirm on the UM2 panel they type of filament loaded | 4) confirm on the UM2 panel they type of filament loaded | ||
<gallery> | |||
22330552382_8ef38840cb_z.jpg | |||
22156655969_6e6378acd8_z(2).jpg | |||
</gallery> | |||
==TroubleShooting== | ==TroubleShooting== | ||
| Line 124: | Line 182: | ||
<image here> | <image here> | ||
[[Category:Training]] | |||
[[Category:SOP]] | |||
Latest revision as of 20:39, 16 November 2015
Ultimaker-2 training guide
This guide covers the skill and knowledge prerequisites for the use of the Ultimaker 3d printers at the hackspace. The Ultimakers are very nice 3d printers and we would like them to stay that way. Please read through this doc, and be sure to bring a preprepared gcode file with you when attending the Ultimaker induction which we will print at the session.
The Ultimakers are provided by wevolver, and are being used for their Robots for good project. Therefore they will have priority on usage of the machines. So please be prepared to be flexible in usage. If you absolutely need something printing, then consider using a commercial 3d-printing service.
The intention is that members using the Ultimakers will already have some experience with 3d-printing, and would be familiar with concepts such as CAD modelling, STL files, gcode files, and slicing models for 3d printing. If you are not familiar with these terms, I would suggest that you start by watching some of the excellent tutorial videos available, and then do the induction/training on the hackspace's Lulzbot 3d printer.
The Ultimakers are setup nicely for PLA, and the manufacturer recommends PLA for beginners. Therefore 3mm PLA is the only filament material that should be used in the Ultimakers at this time. This is important as switching between filament material types complicates maintaining the printers and is a common source of nozzle blockage.
If you have any questions about materials, please email the maintainers from the link here Equipment/Ultimakers.
Costs
The fee to cover running costs of the Ultimakers is based on filament used. The charge is currently 50p/metre of filament. Cura estimates the amount of filament that will be used here;
You can configure Cura to tell you how much the print will cost by setting the filament cost in the preferences;
Please pay by leaving the money in the tin.
Reference Docs
There is some additional documentation linked to from the wiki page relating to the equipment; https://wiki.london.hackspace.org.uk/view/Equipment/Ultimakers
Getting Started
Download Cura for your platform, and install
https://ultimaker.com/en/products/cura-software
You will need to prepare and slice your CAD model using Cura. There is no PC attached to the Ultimakers, so do this beforehand.
Bring something to print, sliced with Cura
Please design or download some small 3d print model, and prepare a gcode file that Cura says will take less than 20 minutes to print. There are loads of examples on Thingiverse, you might have to scale it down in order to print in 20 mins or less.
3mm PLA filament, and an sdcard
There is currently filament available, (Blue PLA 3mm) and it’s available for use, and the cost will be 50p per metre used. However if it’s used up, you will need to provide your own.
Our Ultimaker configuration requires that gcode be provided on an sdcard. There is one sdard in the machine at present, but I would suggest bringing your own in case it’s not there.
Download the Ultimaker-2 user manual
It can be downloaded from here; https://ultimaker.com/download/3978/UserManual-UM2-v2.pdf
Please read the whole doc, is pretty short and mostly full of pictures, so not too much work!
Ultimaker-2 specifications
Initially we will be giving training on the Ultimaker-2 only. However the acnode approval will be extended to the UItimaker-1 when its up and running.
Filament.
Ultimaker suggests using PLA when getting started with the Ultimaker. https://ultimaker.com/en/support/view/11721-general-questions
The printer is currently loaded with this; http://www.amazon.co.uk/dp/B00ERAL6SY/ref=pe_385721_37038051_TE_3p_dp_1
Please don't change the printer settings, as the UM2 is currently nicely setup for 3mm PLA, and if your PLA is not working, please don't use it.
Layer resolution
| Fast: | 200 micron | (0.2 mm) |
| Normal: | 100 micron | (0.1 mm) |
| High: | 60 micron | (0.06 mm) |
| Ulti: | 40 micron | (0.04 mm) |
These can be changed from the advanced tab in Cura
Maintenance
Startup checks
- check that filament is extruding cleanly. It should be free flowing like in this video, and not balling up on the nozzle tip;
{{#ev:youtube|b63cq_Oe5rY}}
- check the first layer height and adhesion. It should be pretty much perfect.
Shutting Down
Please leave the Robotics area tidy, and replace the dust cover on the Ultimaker before you departs.
Thanks!
Changing Filament
There is a youtube video showing the process to change filament here; https://www.youtube.com/watch?v=yIMXL-Qcw84
Unload Filament
- To unload filament, turn the front dial to Material, and then turn to Change.
- The extruder will heat up, and the UM2 will start to retract the filament
- the filament can be removed once it is clear of the feeder wheel
- Visually inspect the tube and the feeder mechanisms, and the extruder to ensure that all remaining filament is clear.
- use tweezers to remove and remaining filament strands
- Press Ready, to finish this process. The extruder will stop retracting.
Load Filament
1) Use a pair of snips to cut a point into the end of the filament, to help it slide into the Feeder tube;
2) To load filament, select material, and then select change, select ready, and it will begin to slowly pull filament into the feeder
3) once the filament is clear, and into the tube, press ready on the UM2 dial panel, and it will rapidly feed the filament to the extruder
4) confirm on the UM2 panel they type of filament loaded
TroubleShooting
Please don’t “press on” if there are problems. This is likely to lead to long term damage and downtime.
Ultimaker link to this Visual troubleshooting guide http://support.3dverkstan.se/article/23-a-visual-ultimaker-troubleshooting-guide#warping
Issues that might arise.
Blockage of nozzle
If the nozzle is blocked, please take the Ultimaker-2 out of service and report the problem to the maintainers.
Filament stuck in Feed Tube
If the filament becomes stuck in the feed tube, between the material feeder and the extruder filament entry hole, then the tube can be removed to allow access.
There is a white clip, possible retained by a blue horse shoe clip. The white clip should be pressed right down, and this un-grips the feeder tube to allow access.
<image here>


