Project:HSRDP: Difference between revisions
From London Hackspace Wiki
m (→TODO) |
|||
| Line 40: | Line 40: | ||
== TODO == | == TODO == | ||
* Get the robot arm working | * Get the robot arm working (refer to page for breakdown) | ||
* Prepare the wheeled chassis for the mounting of the robot arm (arm facing the back) | * Prepare the wheeled chassis for the mounting of the robot arm (arm facing towards the back) | ||
* Figure out the battery management system and power distribution for the chassis and the robot arm.( | * Figure out the battery management system and power distribution for the chassis and the robot arm.(24v battery and robot arm power and 5v for logic) | ||
* Mount the steering motor and electronics. | * Mount the steering motor and electronics. | ||
* Source a 24v battery (2 x 12v) | * Source a 24v battery (2 x 12v) | ||
Revision as of 00:12, 1 September 2013
HSRDP - Hackspace Robotics Development Platform
HSRDP is an attempt to provide a robotics platform for the hackspace to allow people to experiment with higher level robotics functions.
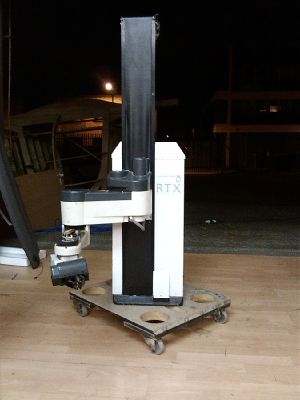
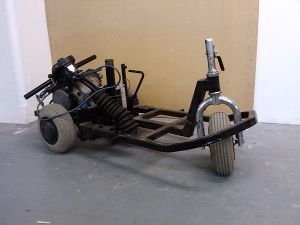
The plan is to sit our UMI robot arm on top of the mobility aid scooter. Plug it all into ROS with some sensors and allow people to make their own nodes for high level functions
It's part of the hackspace and collaborators are welcome, please get in-touch with Mentar (IRC) to find out what you can help. It's a great learning exercise for:
- the stuff that's required to get robot arm working
- Robotics (more higher level stuff!)
- ROS (point clouds, sensing, planning)
- arduino
- motor control
- battery management
Link to random photos from the ongoing project
Status
- Currently trying to replace the Robot arm control board with an arduino mega and 5 h-bridges (waiting for delivery)
People involved
This is a hackspace project and members are encouraged to participate
| Person | What is being done |
|---|---|
| Mentar, Tmlyk, pepelisu | Getting the robot arm functional |
| Mentar | Motor control |
| hipster | Trimming the wheeled chassis, attaching steering motor and power electronics |
TODO
- Get the robot arm working (refer to page for breakdown)
- Prepare the wheeled chassis for the mounting of the robot arm (arm facing towards the back)
- Figure out the battery management system and power distribution for the chassis and the robot arm.(24v battery and robot arm power and 5v for logic)
- Mount the steering motor and electronics.
- Source a 24v battery (2 x 12v)
- Add a kinect + other sensors
- Repaint/beautify the thing
Example uses
- Robotic buttler - Show people around the space, bring club-mate etc
- Robotic bartender - Party/event mode configuration, mix up drinks (this one is quite challenging)
- Telepresense - Self evident uses
System diagram
<graphviz border='frame' format='png' >
digraph rfboard{
  rankdir=TD;
  size="10,5!";

  arduino [label="Arm control board",shape=box];
  kinect [label="kinect",shape=box];
  pi [label="Raspberry pi",shape=box];
  chassis_control [label="Chassis control",shape=box];
  chassis [label="Wheeled Chassis",shape=box];
  robot_arm [label="Robot Arm",shape=box];
  steering [label="Steering motor",shape=box];
  kinect -> pi;
  pi -> arduino;
  arduino -> robot_arm;
  pi -> chassis_control;
  chassis_control -> chassis;
  chassis_control -> steering;
} </graphviz>
Code
The code is stored at our github repository, let the project owners know if you want to be added

