Difference between revisions of "Equipment/RJH Tool Grinder"
(Training requirements clarified) |
|||
| (8 intermediate revisions by 2 users not shown) | |||
| Line 1: | Line 1: | ||
{{EquipmentInfobox | {{EquipmentInfobox | ||
| − | |name= | + | |name=Tool Grinder (RJH) |
| − | |image= | + | |image=RJH Tool Grinder - Main.jpg |
|category=Equipment | |category=Equipment | ||
|subcat=Metalworking | |subcat=Metalworking | ||
| − | |status= | + | |status=Good working order |
| − | |reqtraining= | + | |reqtraining=Yes |
| − | |acnode= | + | |acnode=No |
|origin=Pledge | |origin=Pledge | ||
|owner=LHS | |owner=LHS | ||
|maintainers=Machine Shop Team | |maintainers=Machine Shop Team | ||
| − | |location= | + | |location=Cage |
}} | }} | ||
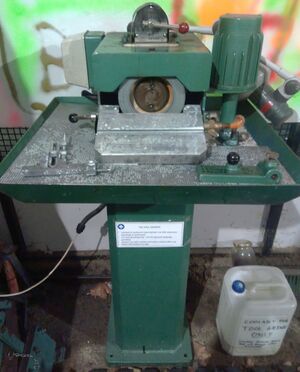
| + | This is a dedicated tool grinder intended for removing small amounts of material to shape heat-sensitive steel cutting tools to specific geometry. It is not a general-purpose metal shaping and grinding tool - the regular bench grinder (on the opposite side of the cage) is a much better tool for this purpose. | ||
| − | + | Training is required for this tool it will be included in lathe training. It is powered via a 16A plug, the extension lead for which is kept in the metal shop toolroom (which is ACNoded) - please do not attempt to use this grinder if you do not have access to the toolroom | |
| − | |||
| − | |||
| − | + | Note that this grinder must be used with a coolant - a separate bottle is located next to the machine which must be tipped into the sump of the grinder before operating. The coolant must be drained out between uses - there is a hose with an inline tap at the front right corner of the grinder for this purpose. Note that this coolant is topped up from the same bottle of oil used for the mill and lathe but once used on the grinder, this coolant will be contaminated with abrasive sludge that will damage other tools so please keep the used coolant separate. The coolant bottle normally lives next to the grinder although in the winter months please keep it in the toolroom - the constant spray during use will numb your hands very quickly if the liquid is cold | |
| − | + | The coolant sump is covered during normal use with a perforated sheetmetal cover, this is useful to stop you dropping tools into the liquid. It does however stop you being able to set the table at the lower end of its range. The cover can easily be removed by lifting the table to its highest position then pulling the cover out, and replaced the same way at the end of a session | |
==Accessory - Wheel Dressing Tool== | ==Accessory - Wheel Dressing Tool== | ||
| Line 26: | Line 25: | ||
There is a wheel dressing tool kept in the metal shop toolroom. This should be used periodically to straighten the face of the wheel and clear out any debris. To use it, extend the dressing tip as little as possible from the jig then run side to side along the tool slot to dress the wheel. Do not remove more wheel than necessary or dress too often as this will reduce the life of the wheel | There is a wheel dressing tool kept in the metal shop toolroom. This should be used periodically to straighten the face of the wheel and clear out any debris. To use it, extend the dressing tip as little as possible from the jig then run side to side along the tool slot to dress the wheel. Do not remove more wheel than necessary or dress too often as this will reduce the life of the wheel | ||
| − | ==Accessory - Angle Setting | + | ==Accessory - Angle Setting Jigs== |
| + | |||
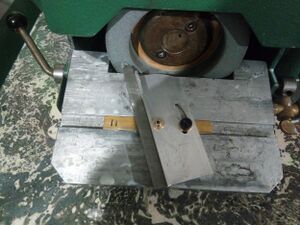
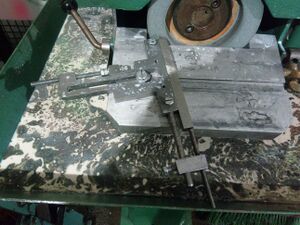
| + | We have constructed 2 angle-settings jig which hold tools at a specified angle for grinding (also kept in toolroom). The first jig is much easier to use and can be used to set end-grinding angles, while the second jig can be used for grinding at other angles (e.g. plunge cutting) and also features feed screws which can control the depth of cut. | ||
| − | + | [[File:RJH Tool Grinder Jig 1.jpg|thumb|left|Jig 1 in use creating a lathe tool]] | |
| + | [[File:RJH Tool Grinder Jig 2.jpg|thumb|left|Jig 2 in use creating a lathe tool]] | ||
Latest revision as of 08:42, 14 December 2022
This is a dedicated tool grinder intended for removing small amounts of material to shape heat-sensitive steel cutting tools to specific geometry. It is not a general-purpose metal shaping and grinding tool - the regular bench grinder (on the opposite side of the cage) is a much better tool for this purpose.
Training is required for this tool it will be included in lathe training. It is powered via a 16A plug, the extension lead for which is kept in the metal shop toolroom (which is ACNoded) - please do not attempt to use this grinder if you do not have access to the toolroom
Note that this grinder must be used with a coolant - a separate bottle is located next to the machine which must be tipped into the sump of the grinder before operating. The coolant must be drained out between uses - there is a hose with an inline tap at the front right corner of the grinder for this purpose. Note that this coolant is topped up from the same bottle of oil used for the mill and lathe but once used on the grinder, this coolant will be contaminated with abrasive sludge that will damage other tools so please keep the used coolant separate. The coolant bottle normally lives next to the grinder although in the winter months please keep it in the toolroom - the constant spray during use will numb your hands very quickly if the liquid is cold
The coolant sump is covered during normal use with a perforated sheetmetal cover, this is useful to stop you dropping tools into the liquid. It does however stop you being able to set the table at the lower end of its range. The cover can easily be removed by lifting the table to its highest position then pulling the cover out, and replaced the same way at the end of a session
Accessory - Wheel Dressing Tool
There is a wheel dressing tool kept in the metal shop toolroom. This should be used periodically to straighten the face of the wheel and clear out any debris. To use it, extend the dressing tip as little as possible from the jig then run side to side along the tool slot to dress the wheel. Do not remove more wheel than necessary or dress too often as this will reduce the life of the wheel
Accessory - Angle Setting Jigs
We have constructed 2 angle-settings jig which hold tools at a specified angle for grinding (also kept in toolroom). The first jig is much easier to use and can be used to set end-grinding angles, while the second jig can be used for grinding at other angles (e.g. plunge cutting) and also features feed screws which can control the depth of cut.


