Denford CNC 2600: Difference between revisions
(Risk Assessment Added) |
|||
| (16 intermediate revisions by 3 users not shown) | |||
| Line 12: | Line 12: | ||
|origin=Donation | |origin=Donation | ||
|location=Ground Floor, Woodshop | |location=Ground Floor, Woodshop | ||
|maintainers= | |maintainers=Jonathan | ||
}} | }} | ||
| Line 46: | Line 46: | ||
===== Manuals ===== | ===== Manuals ===== | ||
*Spindle VFD [[File:Baldor-VS1ST-Micro-Series-Manual.pdf]] | |||
*Stepper drive [[File:MSD556-V2.0 stepper-drive-datasheet-v3.0.pdf]] | |||
====== Obsolete manuals for reference ====== | |||
*User Manual [[File:Router_2600_Pro_Operator_Manual.pdf]] | *User Manual [[File:Router_2600_Pro_Operator_Manual.pdf]] | ||
*VR CNC Control Software v5 Training Guide [[File:VR_Milling_5.pdf]] | *VR CNC Control Software v5 Training Guide [[File:VR_Milling_5.pdf]] | ||
*Some notes on the Baldor Nextmove controller originally fitted [https://www.denfordata.com/bb/viewtopic.php?f=54&t=2264] | *Some notes on the Baldor Nextmove controller originally fitted [https://www.denfordata.com/bb/viewtopic.php?f=54&t=2264] | ||
*Manual for the original Nextmove ST controller [[File:NextmoveST-Installation-Guide.pdf]] - this has an additional top board which adds DSP movement control and replaces the built-in stepper drives with external drives | *Manual for the original Nextmove ST controller [[File:NextmoveST-Installation-Guide.pdf]] - this has an additional top board which adds DSP movement control and replaces the built-in stepper drives with external drives | ||
| Line 57: | Line 58: | ||
*7i76e Connection Guide [[File:7i76_Con_Guide.pdf]] | *7i76e Connection Guide [[File:7i76_Con_Guide.pdf]] | ||
*7i76e Mounting Base [[File:7i76E mounting base 2.pdf]] | *7i76e Mounting Base [[File:7i76E mounting base 2.pdf]] | ||
*May be useful - https://jethornton.github.io/7i76e/install.html | |||
Mesa board outline | |||
Adapter plate to fit Baldor mounts | |||
[[File:7i76 adapter plate.svg]] | |||
Mesa board to be at LHS | Adapter plate is 262x140 with cabinet mounting holes at 132x212, 20 from LHS and 30 from RHS | ||
Mesa board to be at LHS of space. Note that Mesa board outline includes connector space | |||
===== Linuxcnc ===== | ===== Linuxcnc ===== | ||
'''To do''' | |||
*Install Linuxcnc | |||
*Instal Nativecam (a component of linuxcnc) - gives conversational CNC capability | |||
*Create GITHUB Repository | |||
'''Resources''' | |||
*https://www.machinekit.io/docs/hal/intro/ | |||
*http://linuxcnc.org/2022/03/03/LinuxCNC-in-Debian/ | |||
{{:Risk Assessment/ CNC Routers}} | |||
Latest revision as of 07:32, 19 August 2024
| Denford CNC | |
|---|---|
 | |
| Model | 2600 pro |
| Sub-category | CNC |
| Status | View tool status |
| Last updated | 19 August 2024 07:32:52 |
| Training requirement | yes |
| Training link | cnc_denford_2600_training |
| ACnode | not yet |
| Owner | LHS |
| Origin | Donation |
| Location | Ground Floor, Woodshop |
| Maintainers | Jonathan |
Next steps
- Install MESA
- Configure Linuxcnc
- dust extraction
There is a hole at the top rear left of the cabinet which may be used for dust extraction - either a separate unit or a connection to the shop extractor. However, the cutting dust tends to lie around the cutter so some means to move it to the extraction is required. Possibilities are throwing it into the air and then extracting the air, or sucking directly at the cutting tip. There is a small air pump in the cabinet whose output is taken to a connector under the gantry parking position. This may be used to disturb the air near the cutter, and a flexible hose to the extraction used to remove it. The hoses needed may get in the way : this requires some experiment. A dust shoe may be helpful but will hide the cutting point from view.
- Prepare Inductions
- AC Node
Collets
- We are using ER 20 collets
- You will need to provide your own tooling
- Use of collets ER Collet Essentials. https://www.youtube.com/watch?v=WKikm6cQKh0
Training and induction s
TBD
Materials
- This is in the woodshop and to be used on non metal materials only.
- No liquid or mist coolant is to be used in the machine at all.
Schematics
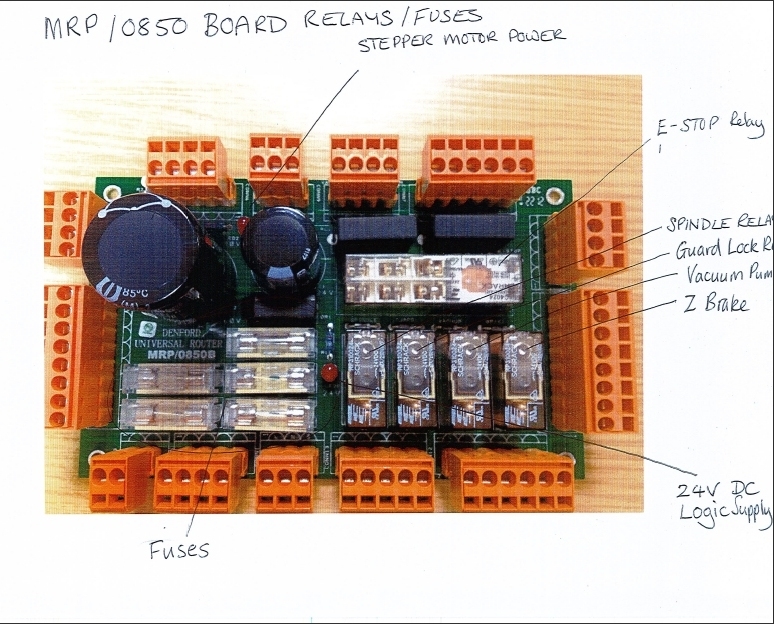
- File:MRP-0850 ESTOP relay contacts.pdf
- Schematic design B (Note we have version A so there maybe some differences) File:Schematic Design MRP-0850B.pdf
- Cabinet Wiring

Manuals
- Spindle VFD File:Baldor-VS1ST-Micro-Series-Manual.pdf
- Stepper drive File:MSD556-V2.0 stepper-drive-datasheet-v3.0.pdf
Obsolete manuals for reference
- User Manual File:Router 2600 Pro Operator Manual.pdf
- VR CNC Control Software v5 Training Guide File:VR Milling 5.pdf
- Some notes on the Baldor Nextmove controller originally fitted [1]
- Manual for the original Nextmove ST controller File:NextmoveST-Installation-Guide.pdf - this has an additional top board which adds DSP movement control and replaces the built-in stepper drives with external drives
MESA 7i76
- 7i76e Manual File:7i76eman.pdf
- 7i76e Connection Guide File:7i76 Con Guide.pdf
- 7i76e Mounting Base File:7i76E mounting base 2.pdf
- May be useful - https://jethornton.github.io/7i76e/install.html
Mesa board outline
Adapter plate to fit Baldor mounts

Adapter plate is 262x140 with cabinet mounting holes at 132x212, 20 from LHS and 30 from RHS
Mesa board to be at LHS of space. Note that Mesa board outline includes connector space
Linuxcnc
To do
- Install Linuxcnc
- Instal Nativecam (a component of linuxcnc) - gives conversational CNC capability
- Create GITHUB Repository
Resources
Risk Assessment - CNC Routers
This risk assessment is intended to provide guidance on the risk associated with the above equipment and activities in normal use. Please also check general risk assessments for the space as a whole. Any discrepancies, errors or concerns should be raised with the document maintainers or trustees - do not edit this assessment directly. For responsible persons and last update, see 'version log' of the assessment page.
Activity
Cutting wood, metal or suitable plastics on the CNC routers
Signage


Understanding Risk Rating
LOW - Ensure current control measures are in place and continue with activity
MED - Control measures may be adequate, co-supervision is recommended
HIGH - Do not undertake activity without further consultation with area specialists
Risk Assessment
| Identify Hazards | Who May be Harmed and How | Severity | Control Measures | Likelihood | Risk Rating |
|---|---|---|---|---|---|
| Incompetent user | User, Bystander | HIGH | Users must not use tools that they are not competent to use. Members must challenge use that they believe is dangerous. Users must read the risk assessment before using a tool. Users must complete induction before use. | LOW | MED |
| Contact with router bit | User | HIGH | Do not touch moving parts of machine once in use Do not put hands into exclusion zone (within 30cm of router bit). CNC should be switched off immediately after use Spindle should stop within 10 seconds of being turned off. Use guard/ doors if available | LOW | MED |
| Ejection of workpiece (Kickback) | User of the tool, users of the room, the space. | HIGH | Check that material to be cut is fixed securely to the bed before switching the machine on. Take particular care when working with smaller pieces of material to ensure the material will not move. Use tabs on your design file whenever you are cutting through material completely. | LOW | MED |
| Dust (inhalation, fire, explosion) | User of the tool, users of the room, the space. | LOW | A respirator or mask should be used whilst operatingun-enclosed tools for prolonged periods | LOW | LOW |
| Blade snatching or jamming | User of the tool, users of the room, the space. | LOW | Do not exceed the recommended feed and speed settings on the CNC Do not exceed recommended cutting depths Make sure that your material is free from foreign objects. Do not make a cut that exceeds your material depth. | LOW | LOW |
| Noise | User of the tool, users of the room. | LOW | Ear protection is advised. | LOW | LOW |
| Flying splinters or broken router bit | User of the tool, users of the room. | MED | Eye protection must be worn whilst using the CNC Eye protection must be worn by all users of the workshop. Do not exceed the recommended feed and speed settings on the CNC Do not exceed recommended cutting depths Make sure that your material is free from foreign objects. Do not make a cut that exceeds your material depth. Close doors on enclosed machines | LOW | LOW |