Project:Darkroom: Difference between revisions
m (→Who's involved?: updated to reflect the past busy week of building etc.) |
(Update on the Darkroom (it's dark, it's wet!)) |
||
| Line 1: | Line 1: | ||
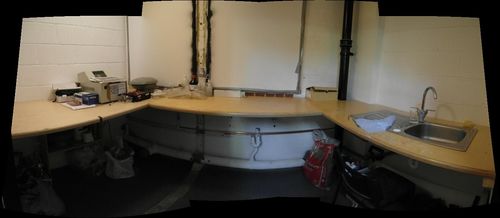
[[File:Darkbioroom19feb2012.jpg|500px|thumb|The Dark/Bio Room]] | |||
= What is it? = | = What is it? = | ||
A combined darkroom & wet room, ideal for photographers, biohackers, and other people who want to do dark, wet things. The initial goal is to get a small darkroom up and running suitable for black & white developing/printing/toning that's also usable as a mini-lab for biohacking experiments. | A combined darkroom & wet room, ideal for photographers, biohackers, and other people who want to do dark, wet things. The initial goal is to get a small darkroom up and running suitable for black & white developing/printing/toning that's also usable as a mini-lab for biohacking experiments. | ||
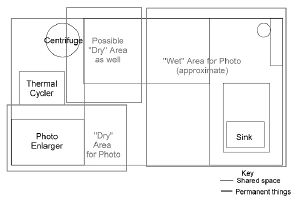
[[File: | [[File:DarkroomlayoutFeb2012.jpg|thumb|New suggested layout for the dark/bio room.]] In the diagram to the right, you can see the wet working area is approximately the right side half of the room. There's a sink at one end. This bench is for all "wet work" – processing film and bio experiments. The left bench is the "dry area", with enlarger labelled on the far left corner. We will build storage shelves under the benches and above the sink. There will eventually be a fridge under the benches somewhere too. Shelves on the left hand wall are probably not reasonable as the depth of the bench makes it extremely difficult to access. | ||
= Where is it? = | = Where is it? = | ||
| Line 8: | Line 9: | ||
= What's the state of play? = | = What's the state of play? = | ||
So far, we have a sink mostly installed (still needs clips to pull it down around the edges and needs to be properly sealed) and it has running cold water. Eventually we might get hot water plumbed in as well, but right now it's completely useable in its current state. | |||
We have '''FIVE''' sockets! All under the bench on the left side of the wall. Currently there's a 4way socket plugged into the single socket furthest into the corner. This runs along under the bench and pops out of the bench through a hole and generally should keep the electrical cables in the awkward, hard-to-reach corner and out of the way of working space. | |||
We have a light switch on the inside of the room and a working lock (which is unlockable from the outside using a large flat-blade screwdriver in case of emergencies). The light switch and the door lock handle both have glow in the dark tape on it. This should be safe for most film purposes but generally keep your film away from it when loading it into the developing tanks (when we acquire these). | |||
The room has been mostly blacked out. We've found we have a mini camera obscura under the left benches thanks to a random hole in the wall (probably for an overflow pipe). This actually lines up perfectly with the passing trains. Best viewed after being in the room with the lights off for 5minutes to get your eyes used to the dark and during a sunny day so the trains are well-lit. | |||
Still on the To Do list: | |||
# | # Acquire darkroom equipment | ||
# Buy any equipment needed. | # Buy any equipment needed. (Safelights? possibly making our own from red LEDs) | ||
# Run some test sessions & inductions to the dark/wet room. | # Run some test sessions & inductions to the dark/wet room. | ||
| Line 42: | Line 41: | ||
== Photography == | == Photography == | ||
* An enlarger & lens | * An enlarger & lens, Laura has offered her lovely DeVere 504 which should do everything from 35mm to 5x4" film | ||
* 2 Paterson tanks & reels (eBay) | * 2 Paterson tanks & reels (eBay) (buy more reels! Always useful to have bone-dry ones --[[User:Akki14|Akki14]] 18:54, 20 February 2012 (UTC)) | ||
* Basic black & white chemistry (developer, stop bath, fixer, wetting agent) | * Basic black & white chemistry (developer(film and print), stop bath, fixer, wetting agent) | ||
* 3 medium trays for print developing (ideally something like 14" by 12") | * 3 medium trays for print developing (ideally something like 14" by 12", though 12"x10" is okay too? --[[User:Akki14|Akki14]] 18:54, 20 February 2012 (UTC)) | ||
* 6x measuring cylinders | * 6x measuring cylinders (We currently have two large 600ml and 1200ml measuring cylinders. Would be good to have 100ml and 45/50ml as well --[[User:Akki14|Akki14]] 18:54, 20 February 2012 (UTC)) | ||
* 2x thermometers | * 2x thermometers | ||
* Print tongs | * Print tongs | ||
* Alligator clips (for hanging prints/films to dry) | * Alligator clips (for hanging prints/films to dry) | ||
* Chemical storage tanks (ideally burpable ones) | * Chemical storage tanks (ideally burpable ones) | ||
* A safelight | * A safelight | ||
Revision as of 18:54, 20 February 2012
What is it?
A combined darkroom & wet room, ideal for photographers, biohackers, and other people who want to do dark, wet things. The initial goal is to get a small darkroom up and running suitable for black & white developing/printing/toning that's also usable as a mini-lab for biohacking experiments.
In the diagram to the right, you can see the wet working area is approximately the right side half of the room. There's a sink at one end. This bench is for all "wet work" – processing film and bio experiments. The left bench is the "dry area", with enlarger labelled on the far left corner. We will build storage shelves under the benches and above the sink. There will eventually be a fridge under the benches somewhere too. Shelves on the left hand wall are probably not reasonable as the depth of the bench makes it extremely difficult to access.
Where is it?
In one of the old bathrooms in Unit 23, next to the laser cutter.
What's the state of play?
So far, we have a sink mostly installed (still needs clips to pull it down around the edges and needs to be properly sealed) and it has running cold water. Eventually we might get hot water plumbed in as well, but right now it's completely useable in its current state.
We have FIVE sockets! All under the bench on the left side of the wall. Currently there's a 4way socket plugged into the single socket furthest into the corner. This runs along under the bench and pops out of the bench through a hole and generally should keep the electrical cables in the awkward, hard-to-reach corner and out of the way of working space.
We have a light switch on the inside of the room and a working lock (which is unlockable from the outside using a large flat-blade screwdriver in case of emergencies). The light switch and the door lock handle both have glow in the dark tape on it. This should be safe for most film purposes but generally keep your film away from it when loading it into the developing tanks (when we acquire these).
The room has been mostly blacked out. We've found we have a mini camera obscura under the left benches thanks to a random hole in the wall (probably for an overflow pipe). This actually lines up perfectly with the passing trains. Best viewed after being in the room with the lights off for 5minutes to get your eyes used to the dark and during a sunny day so the trains are well-lit.
Still on the To Do list:
- Acquire darkroom equipment
- Buy any equipment needed. (Safelights? possibly making our own from red LEDs)
- Run some test sessions & inductions to the dark/wet room.
Who's involved?
- alexp pitched the project, but has no time to drive it any more.
- Phil's helped out by building the benches and helping attach blackout curtain frames around the windows.
- Nicholas helped clean out the room so we could see what's staying and what was just being stored in the room.
- Paddy D's plumbed in a sink (wombled to us by Billy)
- User:Atom is willing to help with building and equipment setup
- bugs was very helpful in explaining a biohacker's needs for the room.
- Akki14 has been organising people to finally finish the darkroom. Eventually will help teach others how to use everything.
- bluboxthief is willing to pick up donated equipment.
- Others have wombled up some equipment already.
- All volunteers welcomed.
Other interested people
- Smfenn
- Laura
Shopping list
Photography
- An enlarger & lens, Laura has offered her lovely DeVere 504 which should do everything from 35mm to 5x4" film
- 2 Paterson tanks & reels (eBay) (buy more reels! Always useful to have bone-dry ones --Akki14 18:54, 20 February 2012 (UTC))
- Basic black & white chemistry (developer(film and print), stop bath, fixer, wetting agent)
- 3 medium trays for print developing (ideally something like 14" by 12", though 12"x10" is okay too? --Akki14 18:54, 20 February 2012 (UTC))
- 6x measuring cylinders (We currently have two large 600ml and 1200ml measuring cylinders. Would be good to have 100ml and 45/50ml as well --Akki14 18:54, 20 February 2012 (UTC))
- 2x thermometers
- Print tongs
- Alligator clips (for hanging prints/films to dry)
- Chemical storage tanks (ideally burpable ones)
- A safelight
- I can provide almost everything on this list, except the safelight,if it comes together fairly soon.
(Laura)
Biohacking
A biohacker should write this section.

