Project:Darkroom: Difference between revisions
| Line 18: | Line 18: | ||
So far, the plumbing is ready. There are some small sinks but ideally we will like to get an industrial one with shower or around 1.5 meters long ( 100 pounds second hand)<br> | So far, the plumbing is ready. There are some small sinks but ideally we will like to get an industrial one with shower or around 1.5 meters long ( 100 pounds second hand)<br> | ||
Sat 10th Jan 2015 Update:<br> | |||
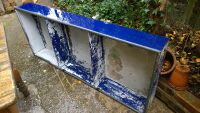
We acquired a proper darkroom 3-section sink (see pic) <br> | |||
[[File:Darkroom-sink-overview.jpg|200px|thumb|The Sink]] | [[File:Darkroom-sink-overview.jpg|200px|thumb|The Sink]] | ||
Walls about 2/3 done. Electrics started. Double tube fitting installed (working) above etch tank to replace the one which needed removal to facilitate the wall. | |||
There is need to build up a wall that divides it from the etching and dry area and isolates it from the dust and other workshop facilities. | There is need to build up a wall that divides it from the etching and dry area and isolates it from the dust and other workshop facilities. | ||
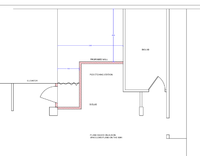
As well there is a need to build the wall and set up a curtain as its sketched in the map. | As well there is a need to build the wall and set up a curtain as its sketched in the map. | ||
| Line 27: | Line 29: | ||
Currently there's '''two''' sockets. All need to be rewired around the room- | Currently there's '''two''' sockets. All need to be rewired around the room- | ||
We need a light switch on the inside of the room with a light on the outside that will show if someone is working on the room, and a working lock (which is unlockable from the outside using a large flat-blade screwdriver in case of emergencies). The light switch and the door lock handle both have glow in the dark tape on it. This should be safe for most film purposes but generally keep your film away from it when loading it into the developing tanks (when we acquire these). | We need a light switch (pull-switch inline on fluoro probably) on the inside of the room with a light on the outside that will show if someone is working on the room, and a working lock (which is unlockable from the outside using a large flat-blade screwdriver in case of emergencies). The light switch and the door lock handle both have glow in the dark tape on it. This should be safe for most film purposes but generally keep your film away from it when loading it into the developing tanks (when we acquire these). Also need red (and maybe dark yellow) safelight installed. | ||
After all the room needs to be blacked out. | After all the room needs to be blacked out. | ||
Still on the To Do list: | Still on the To Do list: | ||
# | # Finish the walls, mount & plumb in sink, finish electrics. | ||
# Run some test sessions & inductions to the dark/wet room. | # Run some test sessions & inductions to the dark/wet room. | ||
# Plan the workshops for photography developing, film and screenprint | # Plan the workshops for photography developing, film and screenprint | ||
Revision as of 18:05, 11 January 2015
Status
A new group is forming to set up a new darkroom/wet lab in the new space! Blanca Regina 19:23, 9 February 2014 (UTC) We are gonna pledge for the materials we need and try to get on the construction to have something ready before the open day 1st june 2014
What is it?
A multipurpose space,a combined darkroom & wet room, ideal for photographers, film developing and screen printing and other people who want to do dark, wet things. The initial goal is to set the darkroom up and running suitable for black & white developing/printing/toning/screenprinting.
In the diagram, you can see the wet working area is at the back of the room. There's is the plumbing ready to fit a sink at one end. This bench is for all "wet work" – processing film and more. a In front of this area a big table 2 meters long at least for "dry area". We will build storage shelves under the benches and above the sink.
Where is it?
In the basement
What's the state of play?
PDF version of the darkroom layout proposal: File:Darkroom Proposal.pdf
So far, the plumbing is ready. There are some small sinks but ideally we will like to get an industrial one with shower or around 1.5 meters long ( 100 pounds second hand)
Sat 10th Jan 2015 Update:
We acquired a proper darkroom 3-section sink (see pic)
Walls about 2/3 done. Electrics started. Double tube fitting installed (working) above etch tank to replace the one which needed removal to facilitate the wall. There is need to build up a wall that divides it from the etching and dry area and isolates it from the dust and other workshop facilities. As well there is a need to build the wall and set up a curtain as its sketched in the map. For the hot water we might need a heater. There is one for the kitchen facilities that is in storage we need to ask for it or another. There is some photography equipment but we may need to get all back and in good night. Locate the light unit for a light table and screen-print. Along that fit the rest of the equipment for film and screenprint processing Currently there's two sockets. All need to be rewired around the room-
We need a light switch (pull-switch inline on fluoro probably) on the inside of the room with a light on the outside that will show if someone is working on the room, and a working lock (which is unlockable from the outside using a large flat-blade screwdriver in case of emergencies). The light switch and the door lock handle both have glow in the dark tape on it. This should be safe for most film purposes but generally keep your film away from it when loading it into the developing tanks (when we acquire these). Also need red (and maybe dark yellow) safelight installed. After all the room needs to be blacked out.
Still on the To Do list:
- Finish the walls, mount & plumb in sink, finish electrics.
- Run some test sessions & inductions to the dark/wet room.
- Plan the workshops for photography developing, film and screenprint
Who's involved?
- PaddyD
- tgreer
- Blanca Regina
- Sally Golding
- Ruben Wyan
- Pierre
- Doing
- Syd Kemp
- Max Bye
Those involved in same at Cremer St:
- Phil helped out by building the benches and helping attach blackout curtain frames around the windows.
- Nicholas helped clean out the room so we could see what's staying and what was just being stored in the room.
- Paddy D plumbed in a sink (wombled to us by Billy) // again Paddy (doing some plumbing)
- User:Atom helped with building and equipment setup
- bugs was very helpful in explaining a biohacker's needs for the room.
- bluboxthief was willing to pick up donated equipment.
- Others wombled up equipment.
Other interested people
- Simon Klyne
- Kitty Wong
- Alex P
- Shim
- Smfenn
- Laura
- jasiek
- datagramm
- Yuri Pattison
- Matt Kay
- User:Lesterhawksby
Shopping list
See pledge page https://wiki.london.hackspace.org.uk/view/Pledge:_Darkroom
Measures
Tall of the side 2.50 Tall of the front 2.46 Tall inside 2.70 Tall where the grey floor .269
I just got this infos extra about suppliers ( Alice White recommended this ) arnold laver . Timberworld.co.uk Phone 01708529500
Curtains for isolating
Big industrial sink
A big darkroom sink has now been obtained from User:Lesterhawksby's garden shed with transport help from Paddy and Tgreer but needs a lot of cleaning up. Warning, it seems to be acrylic under the paint, so don't try to clean it with extreme heat or strong chemicals without doing a test patch first.
Photography
- Chemical storage tanks/bottles for working solution (ideally burpable ones)
Future Projects
- Workshops
- Film processing (photo, 8 and 16mm)
- Screenprint
- Holography
- Kirlian Photography


