Equipment/Staubli: Difference between revisions

From London Hackspace Wiki
mNo edit summary
No edit summary
Line 67: Line 67:
* Necessary
* Necessary
** <s>Build a smooth solid table surrounding the arm.</s>
*** <s>Install final top section. (Jon to do this next week)</s>
*** <s>Build square frames to support the rear sections of the table top.</s>
*** Drill frame and screw tops down.
*** Round the two corners so they don't hurt when you bump in to them.
*** Round over the entire edge all the way round with a router.
*** Sand, Varnish (2 coats) & Polish the surface.
*** <s>Drill large hole in rear sections to robot install cable.</s>
** <s>Move 3-phase mains socket to below table top, by locker.</s>
** Install flashing light
** Install two emergency stop buttons on frame at front and wire in to controller.
** Fit batten to long wall and build frames to support 3m long worktop. Fit long work surface
** Mount CS7 controller, off floor, on wooden frame ? to allow airflow from below.
** Write the [[Equipment/Staubli/g-code_interpreter|G-code interpreter]] for CNCing and 3d printing.
** Integrate the armpi with the controller better (power it from the 3 phase socket)
** Design and make the electronics for the controller to talk to the arm base (heated bed, calibration probe etc) and the end effector (spindle, extruder)
** <s>Check and top up oil all the joints as per manual instructions 1st 5 axes:http://www.alexoil.co.uk/lumach-ep-gear-oil-iso-68--1l_p115.aspx
** Wrist:http://www.alexoil.co.uk/lumach-ep-gear-oils-iso-150--1l_p125.aspx</s>
** <s>Replace the battery 6v 8AH lead acid battery - this one: http://uk.rs-online.com/web/p/lead-acid-rechargeable-batteries/2651975/</s>
** <s>Install it in it's dedicated area</s>
** <s>Make the cable from the arm (han-dd108m, han-dd72/han-K6/36 straight/angled) to the controller</s>  Done 24/8/13 Padski
** <s>Make the cable for 3 phase power to controller.</s>
** <s>Make a mobile but stable platform for the robot and the controller (volunteers welcome)</s>Thanks cepmender!!
** <s>Get dummy plug for teaching pendant socket: Mouser Pt.Nos. # 571-66360-4 x 5 and # 571-2060371 x 1.</s>


* Nice to have
* Nice to have
** <s>Get/print the housings for the robot arm cable</s> (using new cable)
** <s>Document .</s>
** Hook up the arm to ROS
*** Rewrite the ROS Industrial libraries to use a serial stream instead of IP+port combo
*** <s>Write the ros serial server to run on the controller </s>


== Docs/Links ==  
== Docs/Links ==  

Revision as of 13:48, 10 March 2018

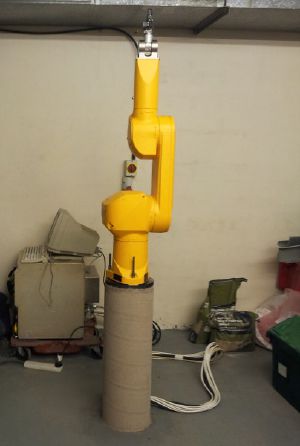
Staubli robot arm
StaubliOnPillar.jpg
Model RX60L
Sub-category Robotics
Status Under construction
Last updated 4 August 2022 21:26:32
Consumables Filament,cnc
Accessories PLA/ABS extruder + heated bed, spindle motor, accessory electronics, spare arm for parts (on loan from Mentar+Artag)
Training requirement Yes
ACnode YES
Owner Robotics group
Origin Donation
Location Basement, Robotics/CNC area
Maintainers mentar, padski, JonRussell


Kindly donated to us by Queen Mary's University, was missing arm and power cables.

The arm is being worked on by the robotics group (more help welcome) and the plan is to turn it into a cnc/3d printer/plasma cutting machine and open up to the general membership once safe to do so.

Applications

  • Currently worked on
    • 3D printing (Dependent on the G-code interpreter)
    • CNC (Dependent on the G-code interpreter)
    • PCB manufacture:
      • Milling
      • Drilling
      • solder paste application for SMT components
      • pick and place for SMT components
  • Potential applications
    • 3D scanning possibly using KinectFusion
    • Persistence of vision experiments (such as this display at Trafalgar Square)
    • High speed orbital photography

Status

Arm is able to interpret g-code. Some PCB milling has been done but can not control speed well currently and due to lack of a stationary table the positioning of the stock is tricky. Table top should be arriving soon.

Specs

  • Robot arm
    • Type: RX60L
    • Reference/machine number: 597411 - 01
    • Fabrication Le F - 12 - 1997
    • Masse kg 42Kg
  • Controller
    • Type CS7 - M RX60
    • 3 x 400V - 50/60 Hz
    • 4000VA
    • Masse kg 80Kg

Some photos/videos of the beast

There is a 19 way cable running inside the arm, to allow external signals to be routed to the end effector. This uses a 19 way plug on the wrist joint and base called a Binder Connector.

There is a 50 way connector (J11) at the back of the controller containing the digital IO lines.

TODO

  • Necessary
    • Build a smooth solid table surrounding the arm.
  • Nice to have
    • Document .

Docs/Links

Gcode demos

Robot startup/shutdown procedure

GZipped image of the 840MB drive

Technical manual with schematics

Arm Manual

V+ Language Reference

V+ Language User Guide

CS7 User Guide

CS7 Electrical Diagrams

Padski's Cable Schematic

  • Note Teaching Pendant connector needs pins 6+7 (estop), 14+16 (deadman) linked. DUMMY PLUG NOW MADE Padski 20-9-13  :)

Paper printed manual covering: General, arm, controller, controller options, spare parts

Another paper printed manual covering: Safety, robot coordinates, robot startup, editor, declaration of variables and conversions, commands associated to the main memory, some instructions of the V+ language, digital inputs/outputs, diskette or disc save operations, control of the robot configuration and specific commands, automatic startup-procedure, appendix (both of the manuals are in A4 folders, located in the library first column from the left, 3rd shelf from the top)
The Linux setup on the ARM controller board